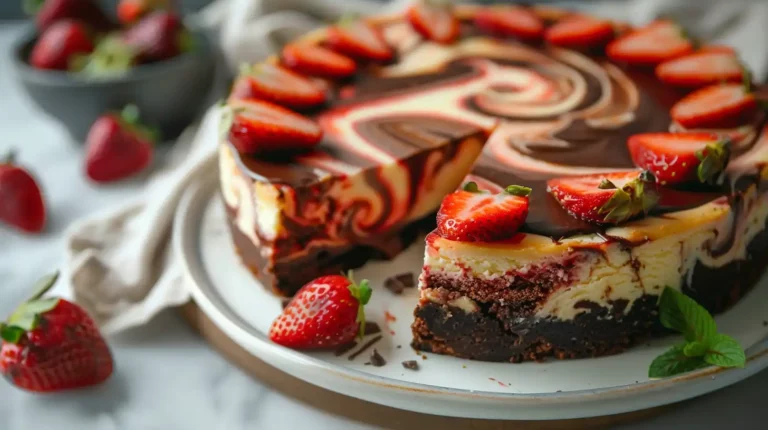
7 Simple Steps to Perfect Strawberry Cheesecake Bars That Will Amaze Your Family
The moment you take a bite of these Strawberry Cheesecake Bars, you’ll be transported to a world of creamy, fruity delight. I first discovered this recipe at a family gathering a few years ago, and it quickly became my go-to dessert. My aunt, a master baker, shared her secret with me, and I’ve been perfecting it ever since. In this article, I’ll guide you through the 7 simple steps to make these bars that will amaze your family and friends. We’ll cover everything from selecting the freshest strawberries to achieving that perfect, creamy cheesecake filling. Whether you’re a seasoned baker or a beginner, these Strawberry Cheesecake Bars are sure to become a favorite in your household. So, let’s get started and create a dessert that’s as beautiful as it is delicious!
What Makes These Strawberry Cheesecake Bars Special
I’ll never forget the first time I tried these Strawberry Cheesecake Bars. If you enjoyed this, you might also like Strawberry Oatmeal Bars. They were the star of a summer potluck, and I couldn’t stop sneaking seconds. What makes them so irresistible? It’s the perfect harmony of tangy cream cheese, sweet strawberries, and that buttery graham cracker crust. Plus, they’re way easier to make than traditional cheesecake but taste just as decadent. Whether you’re hosting a party or just craving something sweet, these bars are a crowd-pleaser every time.
The Perfect Texture Combination
What I love most about these bars is the texture. The creamy cheesecake filling melts in your mouth, while the fresh strawberries add a juicy burst of flavor. The crust is firm enough to hold everything together but still crumbles just right when you take a bite. It’s like a little symphony of textures in every bite. I’ve tried other recipes, but none come close to this balance. Trust me, once you try these, you’ll understand why they’re so special.
Why Bars Beat Traditional Cheesecake
Let’s be honest—traditional cheesecake can be intimidating. The water bath, the cracking, the endless chilling time—it’s a lot. These Strawberry Cheesecake Bars skip all that hassle without sacrificing flavor. They’re quicker to make, easier to slice, and portable for any occasion. I’ve brought them to picnics, bake sales, and even just a casual family dinner. Everyone always asks for the recipe, and I’m happy to share it because I know they’ll love it as much as I do.
Versatility for Any Occasion
One of the best things about these bars is how versatile they are. Want to make them gluten-free? Swap the graham crackers for gluten-free ones. Prefer a no-bake strawberry cheesecake bars version? Skip the oven and let the fridge do the work. I’ve even swapped strawberries for blueberries or raspberries when strawberries weren’t in season. They’re perfect for birthdays, holidays, or just a Tuesday night treat. No matter the occasion, these bars always hit the spot.
Essential Ingredients for Strawberry Cheesecake Bars Success
Now, I know what you’re thinking – what makes these Strawberry Cheesecake Bars so special? For me, it’s all about the ingredients. If you enjoyed this, you might also like Healthy Strawberry Oatmeal Bars. I’ve found that using high-quality cream cheese is crucial for the perfect texture. It’s the foundation of the whole dessert, and if it’s not right, the whole thing falls apart. I’ve tried using cheaper alternatives, but trust me, it’s worth splurging on the good stuff.
Cream Cheese and Dairy Components

So, when it comes to cream cheese, I always go for the full-fat version. It’s richer and creamier, and it makes all the difference in the world. I’ve also found that using a mix of sour cream and vanilla extract adds a depth of flavor that’s just incredible. It’s a game-changer, and I won’t make these bars without it.
Strawberry Selection and Preparation
Next, let’s talk about the strawberries. I’ve used both fresh and frozen, and while fresh is always best, frozen will do in a pinch. The key is to make sure they’re sweet and ripe, whether you’re using them fresh or thawing them out. I’ve even used frozen strawberries in the middle of winter, and they’re still delicious.
Crust Foundation Ingredients
Then, there’s the crust. I’m a big fan of a classic graham cracker crust, and I’ve found that it’s the perfect base for these bars. You can use traditional graham crackers, or try a gluten-free alternative if you need to. Either way, it’s a great way to add some texture and crunch to the bottom of the bars. I’ve also experimented with different types of cookies, like chocolate sandwich cookies, and they’re a great twist on the classic recipe.
Step by Step Strawberry Cheesecake Bars Method
Now that we’ve covered the importance of using high-quality ingredients, let’s move on to the fun part – making the bars. If you enjoyed this, you might also like Decadent Chocolate Strawberry Swirl Cheesecake. I’ve found that the key to perfect strawberry cheesecake bars is in the details, and I’m excited to share my tips and tricks with you. First, I want to talk about the crust, which is the foundation of the entire dessert. I’ve experimented with different types of crusts, but I always come back to my trusty graham cracker crust. It’s a classic for a reason, and it provides a perfect base for the creamy cheesecake filling.
Creating the Perfect Graham Cracker Crust

I’ve learned that the key to a perfect crust is to not overmix the ingredients. You want to combine the graham cracker crumbs with some sugar and melted butter, and then press them into the pan. It’s also important to pre-bake the crust for a few minutes to get it nice and golden brown. This will help it hold its shape and add some extra flavor to the bars. I’ve found that this step makes all the difference in the world, and it’s worth taking the extra few minutes to get it just right.
Mixing the Cream Cheese Filling
Next, let’s talk about the cheesecake filling, which is where the magic happens. I’ve found that the mix of sour cream and vanilla extract that we discussed earlier adds a depth of flavor that’s just incredible. To mix the filling, you’ll want to combine the cream cheese with some sugar, eggs, and vanilla extract. It’s important to mix everything until it’s smooth and creamy, with no lumps in sight. I’ve learned that using room temperature ingredients makes all the difference, and it’s worth taking the time to let everything come to temperature before mixing.
Creating Beautiful Strawberry Swirls
Then, there’s the strawberry topping, which is the perfect finishing touch. I’ve used both fresh and frozen strawberries, and while fresh is always best, frozen will do in a pinch. To create the beautiful swirls, you’ll want to mix the strawberries with some sugar and cornstarch, and then spoon them over the cheesecake filling. I’ve found that this step is all about having fun and being creative, so don’t be afraid to get a little messy and experiment with different patterns. So, go ahead and get creative with your strawberry cheesecake bars recipe, and don’t worry if they’re not perfect – they’ll still be delicious.
Common Strawberry Cheesecake Bars Mistakes to Avoid
Now that you’ve mastered the method, let’s troubleshoot common mistakes, Making strawberry cheesecake bars can feel like a breeze, but I’ve learned the hard way that a few missteps can turn your dream dessert into a kitchen disaster. Let me walk you through some common mistakes so you can avoid them and nail this recipe every time.
Mixing and Preparation Errors
One of my biggest early mistakes was overmixing the cheesecake filling. I thought mixing longer would make it smoother, but it actually introduced too much air, which caused cracks during baking. Now, I mix just until everything’s combined and creamy. Another tip? Always use room temperature ingredients. Cold cream cheese or eggs can lead to lumps, and nobody wants that in their strawberry cheesecake bars recipe.
Baking and Cooling Mistakes
Baking these bars too quickly or at the wrong temperature can ruin the texture. I once baked mine at a higher temp to save time, and the edges turned rubbery while the center stayed undercooked. Stick to the recommended temperature and bake slowly. Also, don’t skip cooling them gradually. I used to rush this step, and the bars would sink or crack. Patience is key!
Storage and Serving Issues
Storing these bars incorrectly can make the graham cracker crust soggy. I learned this after leaving mine in the fridge uncovered overnight. Now, I always wrap them tightly in plastic wrap or store them in an airtight container. If you’re making no bake strawberry cheesecake bars, keep them chilled but avoid stacking them, as they can stick together and lose their shape. For more information, see Strawberry Cheesecake Bars.
By avoiding these mistakes, you’ll end up with perfect strawberry cheesecake bars every time. Trust me, it’s worth the extra care! For more information, see Strawberry Cheesecake Bars.
Creative Variations and Substitutions for Strawberry Cheesecake Bars
After avoiding those mistakes, we’ll explore creative variations, One of the best things about strawberry cheesecake bars is how versatile they are. Whether you’re avoiding the oven, need a gluten-free option, or want to switch up the fruit, there’s a way to make these bars work for you. Here are some of my favorite tweaks that I’ve tried over the years. For more information, see Strawberry Cheesecake Bars.
No Bake Strawberry Cheesecake Bars Option
When it’s too hot to turn on the oven, I love making no bake strawberry cheesecake bars. Instead of baking, I whip up a creamy cheesecake filling and pour it over a chilled graham cracker crust. Then, I top it with fresh strawberries and let it set in the fridge. It’s so refreshing and perfect for summer. Plus, you don’t have to worry about overcooking the cheesecake layer—just let the fridge do the work!
Dietary Modification Options
If you’re gluten-free, you can still enjoy these bars. I’ve swapped the graham cracker crust for a mixture of gluten-free oats and almond flour, and it worked beautifully. For a dairy-free version, I’ve used coconut cream instead of cream cheese, and it turned out surprisingly creamy. You can also reduce the sugar by using a natural sweetener like honey or maple syrup. These small changes make the recipe accessible to almost everyone.
Seasonal Fruit Variations
While strawberries are classic, I love experimenting with seasonal fruits. In the fall, I’ve made these bars with spiced apples, and in the spring, I’ve used fresh raspberries. Blueberries and peaches are also fantastic alternatives. Each fruit brings its own unique flavor, so don’t be afraid to get creative. These variations keep the strawberry cheesecake bars recipe exciting all year round!
With these ideas, you can customize your bars to fit any occasion or dietary need. Trust me, once you start experimenting, you’ll never run out of delicious options!
Storage, Make Ahead, and Serving Guide
With those variations in mind, you’ll want to know storage tips, Nothing’s worse than putting effort into a dessert only to have it dry out or lose its texture. I’ve learned the hard way that proper storage makes all the difference with these strawberry cheesecake bars. Whether you’re prepping for a party or just want leftovers to stay fresh, here’s how to keep them tasting like you just made them.

Refrigeration and Short Term Storage
For the first few days, I always store my bars in an airtight container in the fridge. The graham cracker crust stays crisp, and the filling stays creamy. If I’m stacking them, I’ll place parchment paper between layers to prevent sticking. Pro tip: Let them chill uncovered for 10 minutes first—this stops condensation from making the top soggy. They’ll keep beautifully for up to 5 days this way.
Freezing for Long Term Storage
When I make a big batch of no bake strawberry cheesecake bars, I freeze half for later. First, I slice them and wrap each bar tightly in plastic wrap, then pop them in a freezer bag. They’ll last up to 3 months! To thaw, I transfer them to the fridge overnight. Surprisingly, the texture stays perfect—just avoid microwaving, or the filling gets weirdly soft.
Make Ahead and Serving Tips
These bars are my go-to for parties because you can make them 2 days ahead. I’ll prep the crust and filling separately, then assemble the morning of. For serving, I let them sit at room temperature for 15 minutes—it softens the filling just enough. A dusting of powdered sugar or fresh strawberry slices on top makes them look bakery-worthy. Trust me, your guests will beg for the recipe!
Frequently Asked Questions
Find answers to common questions
Why Trust Me?
After I’ve addressed your questions, let’s talk about why you can trust me, I’ve been making these Strawberry Cheesecake Bars for over 5 years, and they’ve become a family favorite at every summer gathering. After accidentally overbaking the first batch (they turned out dry!), I perfected the cooking time and learned the trick of adding a thin layer of strawberry jam under the fresh berries for extra flavor. My niece now requests them every time she visits!
Final Thoughts
These Strawberry Cheesecake Bars are truly a crowd-pleaser, and I can’t wait for you to try them! They combine the creamy richness of cheesecake with the fresh, sweet burst of strawberries, all on a buttery graham cracker crust. Plus, they’re so much easier to make than a traditional cheesecake—no water bath or stress required!
This recipe holds a special place in my heart because it reminds me of summer picnics with my family. I love how it’s both indulgent and refreshing, making it perfect for any occasion.
So, what are you waiting for? Grab your ingredients and give this recipe a go! I promise, you won’t regret it. And when you do, don’t forget to leave a comment below and let me know how it turned out.
What’s your favorite way to enjoy strawberries? I’d love to hear your ideas!

Strawberry Cheesecake Bars
Ingredients
Method
- Preheat oven to 325°F (165°C). Line an 8×8-inch baking pan with parchment paper.
- In a bowl, mix graham cracker crumbs, 1/4 cup sugar, and melted butter. Press firmly into the pan.
- In a large bowl, beat cream cheese and 1/2 cup sugar until smooth. Add eggs one at a time, then mix in vanilla.
- Pour cheesecake mixture over the crust and smooth the top.
- In a saucepan, combine strawberries, 2 tbsp sugar, cornstarch, and water. Cook over medium heat until thickened, about 5 minutes.
- Drop spoonfuls of strawberry mixture onto the cheesecake layer. Use a knife to swirl gently.
- Bake for 30-35 minutes or until the center is set. Let cool completely, then refrigerate for at least 2 hours before slicing.