Delicious Burnt Honey Pie: 5 Amazing Tips!
Burnt Honey Pie is not just a dessert; it’s a culinary masterpiece that dances between the realms of richness and nostalgia. Imagine the deep, caramelized flavor of burnt honey melding perfectly with the creamy, flaky crust of a well-made pie. Yes, Burnt Honey Pie is as delightful as it sounds, and the first bite will transport you to a realm where sweet euphoria reigns supreme.
Let’s face it: there’s something inherently comforting about pie, but Burnt Honey Pie takes that comfort to a whole new level. This decadent creation has been the secret weapon in many a baker’s arsenal, winning hearts with its unique taste and rustic charm. Burnt Honey Pie is the kind of dessert that becomes the highlight of any gathering, sparking conversations and second helpings.
Now, you might be wondering what makes Burnt Honey Pie so special. Quite simply, it’s the harmonious balance of flavors—sweet, smoky, and buttery—that keep you coming back for more. So, let’s delve into what makes this pie a must-try and mouthwatering addition to your dessert repertoire.
The Secret Behind Perfect Burnt Honey Pie
Creating the ideal Burnt Honey Pie is akin to embarking on a culinary quest. The secret lies in achieving the perfect burn on the honey, which means bringing it to just the right temperature to develop a slightly smoky, deeply caramelized flavor without crossing into bitterness. For more ideas, check out our guide on Creamy Garlic Butter Shrimp with Rice. It’s a delicate dance—one that requires precision, patience, and a dash of bravery.
Why does burnt honey work so well in a pie? The burnt honey’s complex flavor profile adds a depth that elevates the filling from simply sweet to intriguingly nuanced. It pairs beautifully with a buttery, flaky crust, making each bite an experience rather than just a taste. Curious about why burnt honey is becoming a staple in desserts? Check out this Wikipedia page on honey for more insights.
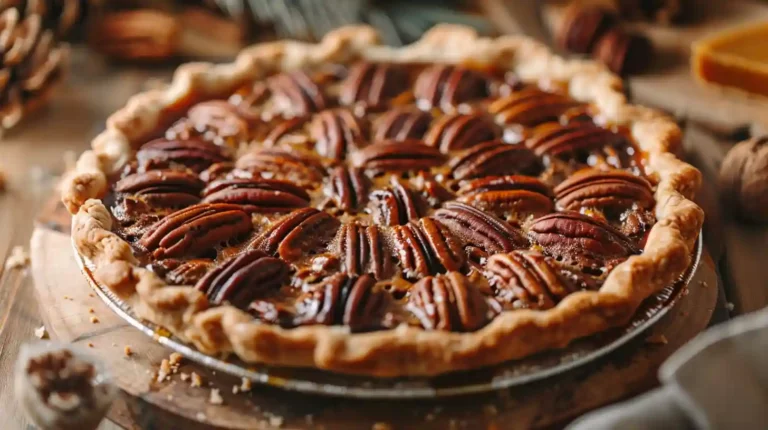
And let us not forget the visual appeal. The deep amber color of the pie is a feast for the eyes, hinting at the rich flavors within. This, my friends, is why Burnt Honey Pie is not only a treat for the taste buds but also a delight for those who appreciate the art of baking.
Ingredients

- 1 1/2 cups all-purpose flour
- 1/2 cup unsalted butter, chilled and diced
- 1/4 cup ice water
- 3/4 cup honey
- 1/2 cup heavy cream
- 1/4 teaspoon sea salt
- 1 teaspoon vanilla extract
- 3 large eggs, room temperature
Instructions
- Preheat your oven to 350°F (175°C). Prepare a 9-inch pie dish by lightly greasing it.
- In a bowl, combine the flour and butter. Use a pastry cutter to mix until the mixture resembles coarse crumbs. Gradually add ice water until the dough just holds together.
- Roll out the dough on a floured surface and fit it into the pie dish. Trim and crimp the edges as desired.
- To make the filling, heat the honey in a saucepan over medium heat, stirring constantly, until it begins to caramelize. This should take about 5-7 minutes. Remove from heat immediately to prevent burning.
- Stir in the heavy cream, sea salt, and vanilla extract. Allow the mixture to cool slightly.
- In a separate bowl, beat the eggs and then slowly whisk them into the honey mixture to avoid cooking the eggs.
- Pour the filling into the prepared pie crust. Bake for 35-40 minutes, or until the filling is set and slightly puffed.
- Remove from the oven and let cool on a wire rack before serving. Enjoy your Burnt Honey Pie warm or at room temperature.

Storage Tips for Maintaining Freshness
To keep your Burnt Honey Pie tasting its best, proper storage is key. Once cooled, cover the pie with plastic wrap or aluminum foil and store it in the refrigerator. This will keep it fresh for up to 4 days. For longer storage, consider freezing slices individually wrapped in cling film and placed in a freezer bag. When you’re ready to indulge, simply thaw overnight in the refrigerator.
5 Reasons Burnt Honey Pie is Revolutionary
- Unique Flavor: The contrast of burnt honey brings a depth of flavor that’s both sophisticated and comforting.
- Visual Appeal: The rich color of the pie is an instant eye-catcher, making it a picture-perfect dessert.
- Versatility: Suitable for both casual occasions and formal gatherings, this pie is a hit anywhere.
- Culinary Creativity: Burnt honey is an underutilized ingredient that showcases your baking prowess.
- Crowd-Pleaser: Few can resist the charm of a well-made Burnt Honey Pie at the table.
Want to learn more about how honey impacts health and nutrition? Don’t miss this informative article from Healthline on the benefits of honey.
Common Mistakes to Avoid
- Overheating the Honey: It’s crucial not to let the honey burn too much or it can become bitter.
- Rushing the Process: Take your time with each step, especially when caramelizing the honey.
- Skipping the Cooling Step: The mixture shouldn’t be too hot when adding the eggs to prevent curdling.
- Underbaking the Pie: Make sure the filling is set and slightly puffed before removing from the oven.
Alternatives and Variations
Looking to switch things up with your Burnt Honey Pie? Consider adding a splash of bourbon to the filling for an added layer of flavor complexity. For those who prefer a nutty twist, topping the pie with a handful of toasted pine nuts or sliced almonds can offer a delightful crunch. Additionally, if you’re catering to dietary restrictions, try using a gluten-free crust or a sugar substitute like maple syrup for a different take on this classic pie.
Pro Tips for Success
- Warm the honey slowly to avoid scorching; slow caramelization gives the best flavor.
- Blind-baking the crust is essential for keeping the bottom firm and preventing sogginess.
- Always whisk the eggs well before adding the honey mixture to avoid curdling.
- If you prefer a firmer pie, increase the cornstarch slightly.
- Let the pie cool completely before slicing—it makes a world of difference in texture.
Flavor Variations
- Brown Butter Version: Replace part of the melted butter with browned butter for even richer flavor.
- Citrus Honey Pie: Add orange zest or lemon zest for a brighter pie with a sunny aroma.
- Salted Honey Pie: Increase the salt slightly and add more flaky sea salt for a sweet–salty finish.
- Spiced Honey Pie: Add cinnamon or cardamom for warm, cozy undertones.
- Nutty Honey Pie: Stir in finely chopped pecans or walnuts for extra texture.
Serving Suggestions
Burnt Honey Pie is wonderful on its own, but it also pairs beautifully with simple, nostalgic sides. A dollop of softly whipped cream adds lightness and contrast. A scoop of vanilla ice cream creates a classic, comforting dessert pairing. For a holiday table, consider serving it alongside spiced apples or warm tea.
If you love cozy desserts, this pie fits perfectly into autumn gatherings, winter holidays, or any celebration where homemade treats shine.
Storage and Freezing Instructions
Store leftover Burnt Honey Pie covered in the refrigerator for up to three days. The flavors often deepen on the second day, making each slice even more enjoyable.
Freezing is possible but not ideal. Custard pies sometimes separate when thawed, which can affect texture. If you do choose to freeze it, wrap slices tightly and thaw them in the refrigerator overnight before serving.
Frequently Asked Questions
Find answers to common questions
Wrapping Up
In conclusion, the Burnt Honey Pie is more than just a dessert; it’s an experience of flavor that intertwines beautifully with its rich heritage in baking. With its unique blend of burnt honey and buttery crust, it’s sure to become a favorite in your baking repertoire. Whether you’re making it for a special occasion or a casual get-together, it’s a surefire way to impress and satisfy your guests.
Don’t wait any longer to try your hand at this delicious creation. Share your Burnt Honey Pie adventure with friends and family, and relish in the compliments that are sure to follow. For further pie baking tips and tricks, be sure to check out more resources from the Serious Eats website to enhance your culinary skills.
PrintDelicious Burnt Honey Pie: 5 Amazing Tips!

A warm, gooey pie with caramelised honey, a flaky crust and just enough edge — the Burnt Honey Pie brings richness and nostalgia in every bite.
- Prep Time: 20 minutes
- Cook Time: 35 minutes
- Total Time: 55 minutes
- Yield: 8 servings
- Category: Dessert
- Method: Baked
- Cuisine: American
- Diet: Vegetarian
Ingredients
1 ½ cups all‑purpose flour
½ cup unsalted butter, chilled & diced
¼ cup ice water
¾ cup honey
½ cup heavy cream
¼ tsp sea salt
1 tsp vanilla extract
3 large eggs (room temperature)
Instructions
1. Preheat oven to 350 °F (175 °C). Lightly grease a 9‑inch pie dish.
2. In a bowl combine flour and butter; use pastry cutter until mixture resembles coarse crumbs.
3. Gradually add ice water until dough just holds together. Roll out dough and fit into dish; trim and crimp edges.
4. In a saucepan heat the honey over medium heat, stirring constantly, until caramelised (about 5‑7 minutes). Remove from heat immediately.
5. Stir in heavy cream, sea salt and vanilla extract; allow slight cooling.
6. In a separate bowl beat the eggs then slowly whisk into the honey mixture.
7. Pour filling into crust and bake for 35‑40 minutes until set and slightly puffed.
8. Remove from oven and cool on a wire rack before serving.
Notes
Let the pie cool fully before slicing so the filling firms nicely.
For gluten‑free crust use a gluten‑free flour blend.
For a nutty finish, top with toasted almonds or pecans before serving.