Amazing Greek Yogurt Bagels: 5 Best Tips!
Greek yogurt bagels are the ultimate breakfast game-changer that’ll have you ditching store-bought bagels for good. These fluffy, protein-packed delights come together in just minutes without any yeast, complicated techniques, or mysterious ingredients. Whether you’re a meal-prep enthusiast or someone who just wants to impress their family with homemade breakfast, Greek yogurt bagels deliver the goods. They’re naturally high in protein, incredibly easy to customize, and honestly? They taste like you spent hours perfecting them when really you spent like 15 minutes. If you haven’t tried making Greek yogurt bagels yet, you’re about to discover your new favorite kitchen hack.
The Complete Guide to Perfecting Your Homemade Greek Yogurt Bagels
There’s something genuinely magical about the simplicity of Greek yogurt bagels. The dough comes together with basically no kneading, no rising time, and zero yeast required. Most people think bagel-making involves boiling water and special equipment, but Greek yogurt bagels completely flip that script.
The secret behind these beauties lies in the Greek yogurt itself. It provides moisture, creates a tender crumb, and adds that protein boost that regular bagels simply can’t match. When combined with just a few other pantry staples, the yogurt transforms into golden-brown bagels that taste infinitely better than what you’d grab at the bagel shop. For a deeper understanding of how yogurt works in baking, check out the science behind yogurt fermentation and its culinary applications.
The beauty of Greek yogurt bagels is their versatility. You can have them ready in under 30 minutes from start to finish. Dress them up with everything seasoning, keep them simple with just cream cheese, or go full breakfast sandwich mode. For more ideas, check out our guide on Easy Homemade Eggnog Recipe with Spiced Rum. The possibilities are genuinely endless, and that’s what makes this recipe so special for busy mornings and lazy weekends alike.
Ingredients

- 1 cup all-purpose flour (or gluten-free flour)
- 2 teaspoons baking powder
- ¾ teaspoon salt
- 1 cup non-fat Greek yogurt
- 1 egg, beaten
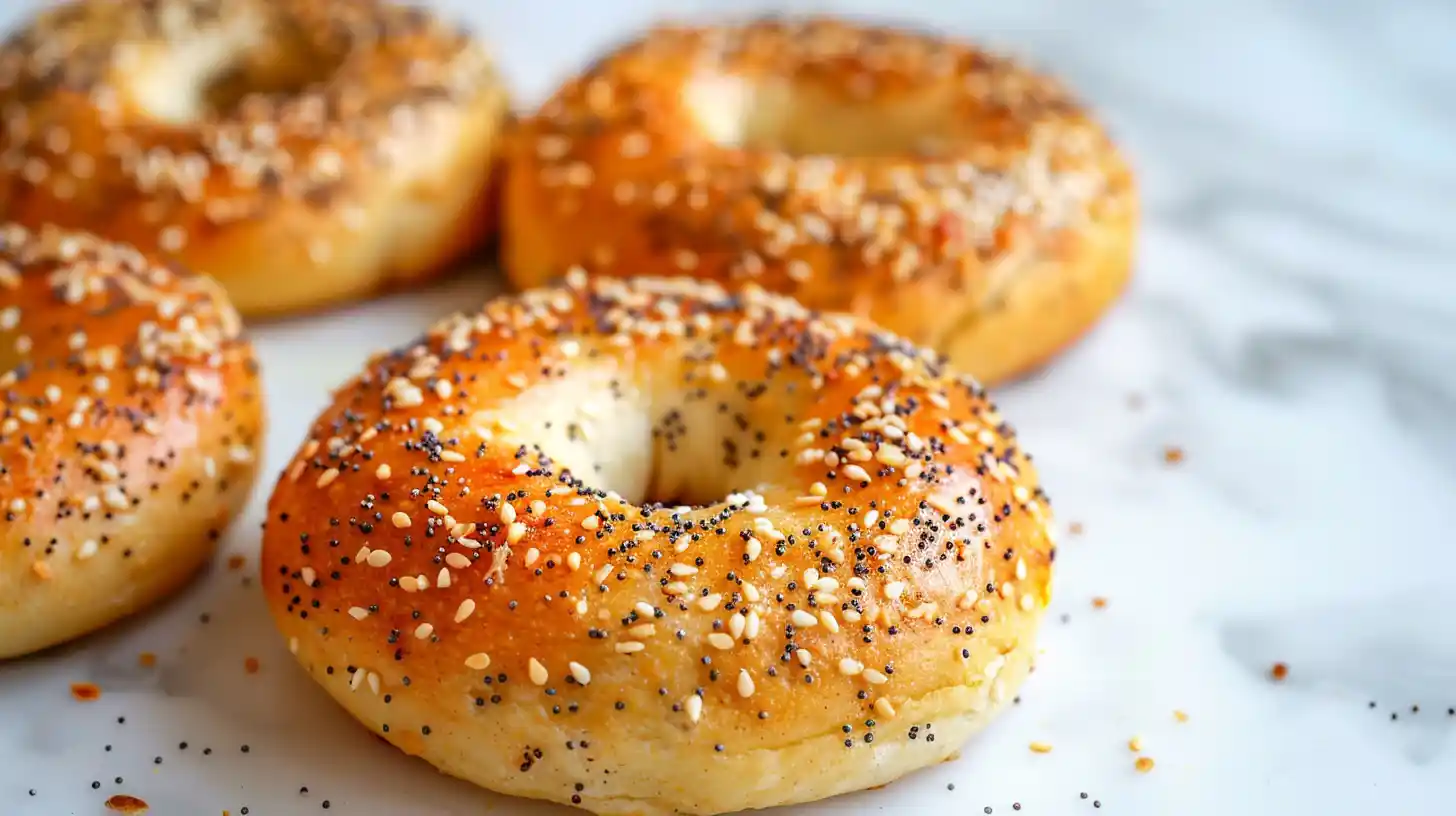
- Optional toppings: everything bagel seasoning, sesame seeds, poppy seeds, or flaky sea salt
Instructions
- Preheat and prepare: Set your oven to 375°F and line a baking sheet with parchment paper. This prevents sticking and makes cleanup way easier.
- Mix dry ingredients: In a large bowl, whisk together flour, baking powder, and salt. Make sure everything is evenly distributed so you don’t end up with unexpected pockets of baking powder.
- Add the yogurt: Pour in your Greek yogurt and mix using a wooden spoon or spatula. The mixture will look crumbly and weird at first—that’s totally normal and exactly what you want.
- Knead the dough: Use your hands to bring everything together into a cohesive dough ball. Knead it about 15 times on a lightly floured surface until it’s tacky but not sticky. If it seems too dry, add a teaspoon of water.
- Shape your bagels: Divide the dough into four equal pieces. Roll each piece into a ball, then poke your thumb through the center to create that classic bagel hole. Don’t stress about perfection—they’ll look way better after baking.
- Apply toppings: Brush each bagel with beaten egg wash and sprinkle your desired toppings. Everything seasoning, sesame seeds, or just flaky salt all work beautifully.
- Bake to golden perfection: Place bagels on your prepared baking sheet and bake for 22-25 minutes until they’re golden brown. Your kitchen will smell absolutely incredible.
- Cool and enjoy: Let them cool for five minutes on a wire rack before digging in. This helps them set properly so they hold together perfectly.

Pro Storage Tips for Maximum Freshness
Same-day storage: Fresh Greek yogurt bagels are best enjoyed the day you make them, but they’ll stay soft in an airtight container for up to two days. Store them at room temperature away from direct sunlight.
Freezing for later: Slice your bagels before freezing so you can toast them straight from the freezer. Wrap them individually in plastic wrap, then place them in a freezer-safe bag. They’ll keep for up to three months frozen.
Reheating method: Toast frozen bagels directly from the freezer, or thaw them at room temperature for 30 minutes and then toast. A quick spin in the toaster brings back that fresh-baked texture beautifully.
7 Game-Changing Benefits That Make Greek Yogurt Bagels a Breakfast Revolution
- Protein powerhouse: Each Greek yogurt bagel packs approximately 12 grams of protein, making them perfect for muscle recovery and keeping you satisfied until lunch.
- Zero yeast needed: No waiting for dough to rise, no dealing with yeast activation—these bagels are ready in minutes, not hours.
- Naturally nutrient-dense: Greek yogurt brings probiotics and calcium to the table, plus it cuts down on added sugars compared to traditional bagel recipes.
- Budget-friendly: With just five basic ingredients, making Greek yogurt bagels at home costs a fraction of what you’d spend at a bagel shop.
- Customization heaven: Whether you’re into savory everything seasoning or sweet cinnamon sugar, these bagels adapt to your cravings instantly.
- Works with dietary restrictions: Swap regular flour for gluten-free flour and you’ve got yourself a celiac-friendly breakfast option. For more on the benefits of probiotics in Greek yogurt, check out expert resources on digestive health.
- Keeps you full longer: The combination of protein and fiber means you won’t be searching for a snack two hours later.
Common Mistakes That Sabotage Your Greek Yogurt Bagels
- Using regular yogurt instead of Greek: This is the number-one culprit behind bagel failures. Regular yogurt has way too much liquid, and your dough will turn into a sticky mess that won’t hold its shape.
- Skipping the knead step: Those 15 kneads actually matter. They develop the gluten structure and make your bagels chewy instead of dense.
- Overmixing after adding yogurt: Too much mixing toughens the dough. Stir just until combined, then switch to your hands for the final mixing.
- Not lining your baking sheet: Greek yogurt bagels can stick if you’re not careful. Parchment paper is your friend here.
- Baking at the wrong temperature: Too hot and your bagels burn on the outside while staying gummy inside. Too cool and they spread like cookies. Stick to 375°F.
Delicious Variations to Keep Breakfast Interesting
Once you’ve mastered the basic Greek yogurt bagels recipe, the fun really begins. Try adding 2 tablespoons of everything bagel seasoning directly into the dough for pre-seasoned bagels that taste amazing with cream cheese. For more ideas, check out our guide on BBQ chicken slow cooker,easy Crockpot chicken recipe.
For a sweet variation, add 2 tablespoons of sugar and 1 teaspoon of vanilla extract to the dough, then top with cinnamon sugar before baking. You’ll basically have bagel doughnuts, and honestly, that’s not the worst problem to have.
Herb lovers can mix fresh dill, chives, or Italian seasoning into the dough for savory Greek yogurt bagels that pair perfectly with smoked salmon and capers. Experiment with different toppings like za’atar, dukkah, or even everything bagel seasoning to discover your new favorite combination.
Frequently Asked Questions
Find answers to common questions
Final Thoughts on Your Greek Yogurt Bagels Journey
Greek yogurt bagels have genuinely revolutionized breakfast for countless home cooks, and once you make them, you’ll understand why. They’re quick, delicious, protein-packed, and incredibly forgiving for beginners. The fact that you can customize them endlessly means you’ll never get bored.
Whether you’re looking to meal prep for the week, impress guests with homemade bagels, or simply discover a new breakfast favorite, Greek yogurt bagels deliver on every level. Give this recipe a try this weekend, and you’ll probably find yourself making Greek yogurt bagels every week. For more inspiration and recipe ideas, explore creative Greek yogurt recipes from trusted cooking sources to expand your breakfast repertoire. Your mornings are about to get way more delicious.
PrintAmazing Greek Yogurt Bagels: 5 Best Tips!

Soft, chewy Greek yogurt bagels made with just a few simple ingredients for an easy, high-protein breakfast.
- Prep Time: 15 minutes
- Cook Time: 25 minutes
- Total Time: 40 minutes
- Yield: 4 bagels
- Category: Breakfast
- Method: Baking
- Cuisine: American
- Diet: Vegetarian
Ingredients
1 cup all-purpose flour (or gluten-free flour)
2 teaspoons baking powder
3/4 teaspoon salt
1 cup non-fat Greek yogurt
1 egg, beaten
Optional toppings: everything bagel seasoning, sesame seeds, poppy seeds, or flaky sea salt
Instructions
1. Preheat oven to 375°F (190°C) and line a baking sheet with parchment paper.
2. In a large bowl, whisk together flour, baking powder, and salt until evenly combined.
3. Add the Greek yogurt and stir with a wooden spoon or spatula until the mixture looks shaggy and crumbly.
4. Turn the dough onto a lightly floured surface and knead about 15 times until it comes together into a tacky but not sticky ball; add a teaspoon of water if too dry.
5. Divide the dough into 4 equal pieces, roll each into a ball, then poke a hole in the center and gently stretch to form a bagel shape.
6. Place bagels on the prepared baking sheet, brush tops with beaten egg, and sprinkle with desired toppings.
7. Bake for 22–25 minutes, or until the bagels are puffed and golden brown.
8. Cool on a wire rack for about 5 minutes before slicing and serving.
Notes
For extra chew, let the shaped bagels rest 5–10 minutes before baking.
Use gluten-free flour to make these gluten-friendly.
Toast leftover bagels the next day and top with cream cheese, avocado, or eggs.