6 Easy Steps to Perfect BBQ Chicken Skillet That Will Amaze Your Family
Is there anything better than the sizzling aroma of BBQ chicken skillet wafting through the kitchen? I don’t think so! This dish has been a go-to in my household ever since I whipped it up on a whim one busy weeknight. It was one of those days when I just didn’t have the energy to fuss over a complicated meal, so I decided to throw together some of my favorite ingredients. To my delight, the result was a delicious, one-pan wonder that my family couldn’t get enough of.
In this blog post, I’ll walk you through the six easy steps to making the perfect BBQ chicken skillet that’ll wow your family, just like it did mine. You’ll learn how to achieve that ideal balance of smoky, tangy, and sweet flavors, all while keeping the chicken juicy and tender. Plus, I’ll share some of my favorite tips and tricks to ensure your skillet turns out just right every time. From picking the right BBQ sauce to deciding on the best side dishes, I’ve got you covered.
Now, this recipe isn’t only quick and simple, but it’s also incredibly versatile. You can easily customize it to suit your family’s taste buds or to use up what you have on hand. Whether you’re a seasoned cook or a kitchen novice, you’ll find this BBQ chicken skillet a breeze to make. So, grab your skillet and let’s get cooking! By the end of this article, you’ll have all the know-how to serve up a mouthwatering meal that’s sure to become a beloved staple in your home.
What Makes BBQ Chicken Skillet the Ultimate Weeknight Dinner
I’ve been making this bbq chicken skillet recipe for years, and honestly, it’s become my go-to solution when I need dinner on the table fast. If you enjoyed this, you might also like Pepperoncini Chicken Skillet. There’s something magical about how this one-pan wonder delivers all those bold BBQ flavors we crave without the hassle of firing up the outdoor grill. My kids actually prefer this stovetop version to traditional grilled chicken because the meat stays incredibly juicy and tender.
Why Skillet Cooking Beats the Grill
First, let me tell you why I’ve practically abandoned my outdoor grill for this cast iron skillet bbq chicken method. You get complete control over the heat, which means no more burnt outsides with raw centers. Plus, when it’s raining or snowing outside, I don’t have to brave the elements just to satisfy our BBQ cravings. The skillet creates this amazing caramelization that actually rivals anything I’ve ever made on my charcoal grill.
The Science Behind Perfect Skillet BBQ
Actually, the science here is pretty fascinating. When you cook chicken in a hot skillet, the Maillard reaction creates those deep, complex flavors we associate with great BBQ. The confined space traps all the smoky aromas from the sauce, essentially creating a mini smokehouse effect. I’ve found that adding the BBQ sauce in stages prevents burning while building layers of flavor that penetrate deep into the meat.
Time and Energy Savings
Now, here’s where this stovetop bbq chicken really shines – efficiency. While my neighbor spends thirty minutes preheating his grill, I’m already halfway through cooking dinner. The entire process takes just twenty-five minutes from start to finish, and cleanup is a breeze since everything happens in one pan. My energy bill thanks me too, especially during those scorching summer months when I’d rather not heat up the whole backyard.
Essential Ingredients for Cast Iron Skillet BBQ Chicken Success
Now that we’ve covered that, When I first started making my bbq chicken skillet recipe, I learned the hard way that ingredient quality makes all the difference. If you enjoyed this, you might also like Skillet Cranberry Orange Chicken. You can’t just throw any old chicken into the pan and expect magic—every component needs to work together. Over the years, I’ve fine-tuned my shopping list to create the most flavorful cast iron skillet bbq chicken possible. Trust me, these choices matter more than you’d think!
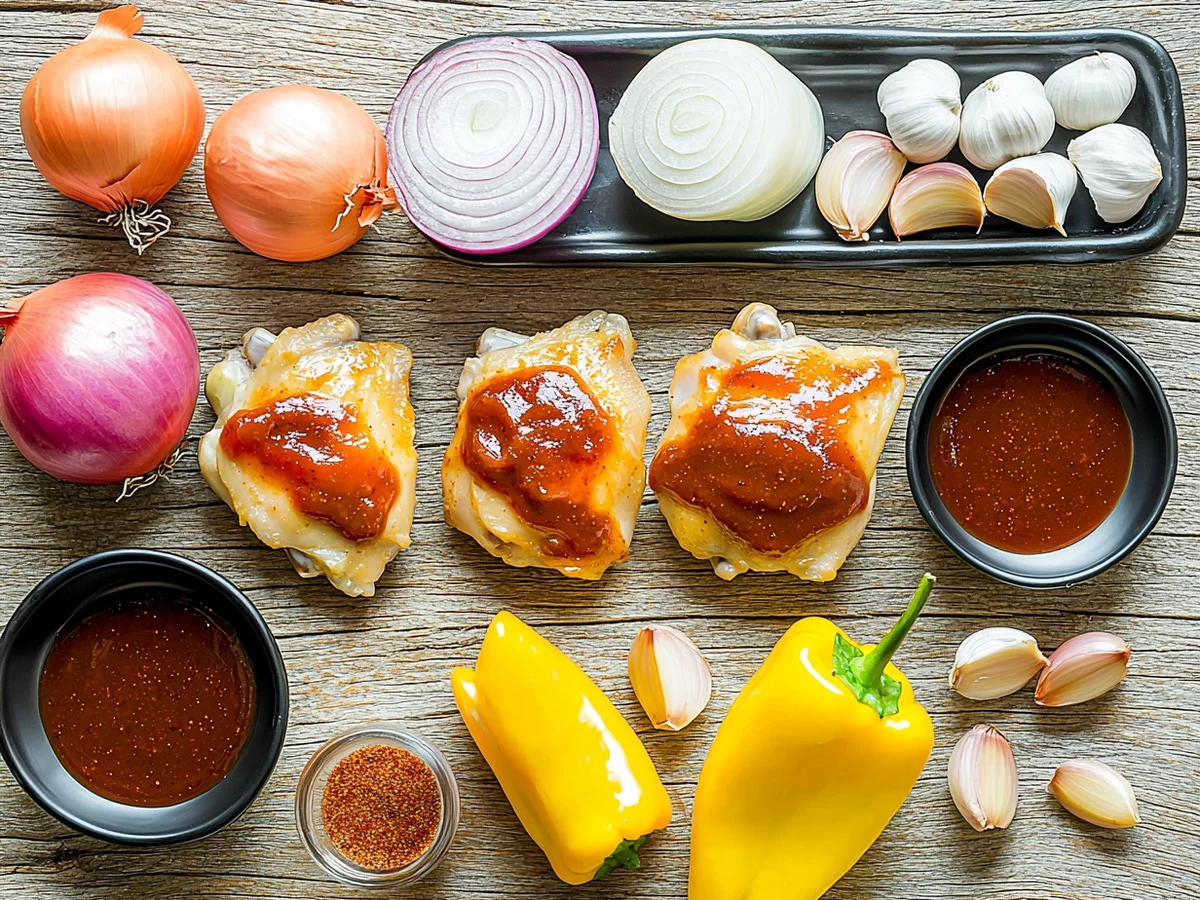
Choosing the Right Chicken Cuts
I always go for boneless, skinless chicken thighs because they stay juicy even if you accidentally overcook them. Breast meat dries out too fast in the high heat of a skillet, but thighs have just enough fat to stay tender. If you prefer white meat, cut it into smaller pieces so it cooks evenly. Pro tip: Pat your chicken dry with paper towels before seasoning—it helps create that perfect sear.
BBQ Sauce Selection Guide
The sauce is where personality shines! I use a smoky, slightly sweet bottled sauce as my base (my current favorite is Sweet Baby Ray’s), but I always doctor it up. A splash of apple cider vinegar brightens the flavor, while a teaspoon of smoked paprika adds depth. Add half the sauce early to let it caramelize, then save the rest for glazing at the end so it doesn’t burn.
Potato and Vegetable Additions
For a one-pan meal, I toss in baby potatoes and bell peppers—they soak up the BBQ flavors beautifully. Parboil the potatoes first so they finish cooking at the same time as the chicken. The peppers add color and a fresh crunch that balances the richness. Sometimes I’ll throw in a sliced onion too, because nothing beats that caramelized sweetness next to smoky stovetop bbq chicken.
Next time you’re at the store, keep these tips in mind. Your skillet (and your taste buds) will thank you!
Step-by-Step Stovetop BBQ Chicken Cooking Method

I always start with my trusty cast iron skillet because it holds heat like nothing else. If you enjoyed this, you might also like Cowboy Bbq Bacon Cheddar Chicken. First, I rub it with a thin layer of oil and get it screaming hot—you should see wisps of smoke rising. That initial sear is everything for locking in juices. Then I dial it back to medium so the chicken cooks through without burning. Pro tip: If your pan smokes too much, just lift it off the heat for 10 seconds. I learned that the hard way after setting off my smoke alarm three times in one week!
Chicken Cooking Sequence
Here’s my golden rule: skin-side down first. I lay those thighs in like they’re going to bed and don’t touch them for 6 full minutes—that’s how you get that crispy, caramelized crust. Flip them just once, then cook another 7 minutes. I use tongs to press lightly; if the juices run clear, we’re golden. Last week my neighbor popped over during this step, and I totally forgot to set a timer. Lesson learned: always use your phone alarm, even if you think you’ll remember!
Sauce Integration Technique
Timing is everything with bbq sauce—add it too early, and it’ll scorch. I brush on the first layer after flipping, letting it bubble into sticky goodness. The second coat goes on in the last 2 minutes, just to warm through. Sometimes I’ll toss in a pat of butter at the end for extra gloss. My kids call this “the shiny chicken” and fight over who gets the sauciest piece. If you’ve got picky eaters, try serving the sauce on the side—it’s how I won over my sauce-averse nephew!
This method turns out stovetop bbq chicken with the perfect balance of char and tenderness every time. Just last Tuesday, I made it for a potluck, and someone asked if I’d grilled it. Nope—just my trusty skillet and a little patience!
Expert Tips for BBQ Chicken and Potatoes Skillet Perfection
Actually, the biggest mistake I see people make is cranking up the heat too high. I keep my burner at medium-high for searing, then drop it to medium-low for the cooking phase. This prevents the outside from burning while the inside stays raw. My meat thermometer is my best friend here—I aim for 165°F internal temperature. Plus, letting the chicken rest for 5 minutes after cooking keeps those juices locked in perfectly.
Ingredient Timing Coordination
First, I get my potatoes going since they need the most time. Then I start the chicken about 10 minutes later. The secret is adding ingredients in waves rather than dumping everything in at once. My onions go in with the potatoes, but I save delicate herbs for the final 2 minutes. I’ve learned this timing through countless dinner disasters—trust me, burnt garlic tastes terrible! Now I set multiple timers on my phone.
Flavor Enhancement Techniques
So here’s my game-changer: I brush bbq sauce in layers instead of drowning everything at once. The first coat goes on after flipping, creating that beautiful caramelized base. Then I add the final glaze in the last 90 seconds for maximum flavor without burning. Sometimes I’ll splash in a tablespoon of apple cider vinegar for tang. My family always asks what makes this stovetop bbq chicken taste so restaurant-quality—it’s all about building those flavor layers patiently.
Common Easy BBQ Chicken Skillet Mistakes to Avoid
Moving on, When I first started crafting my favorite bbq chicken skillet recipe, I made a few blunders that turned my meals into disasters. It’s taken some practice, but I’ve learned how to spot potential pitfalls. For more information, see FDA Food Safety.
Pan Overcrowding Problems
Let me tell you, I’ve tried cramming everything into my trusty cast iron skillet before, thinking it’d save time. Big mistake! Overcrowding means uneven cooking and soggy chicken. I remember one dinner where the chicken was practically swimming in its own juices, which isn’t ideal for getting that delicious sear. Now, I’ve learned to give each piece its space, allowing the heat to circulate properly. It’s like giving your chicken its own little spotlight on the stovetop stage! For more information, see USDA Food & Nutrition.
Sauce Application Errors
There was a time when I used to slather on the bbq sauce way too early. The first few tries ended with a burnt, bitter crust that nobody enjoyed. Timing is crucial here. I wait until the chicken is almost done before brushing on the sauce. This way, it caramelizes just right without burning. And if I’m feeling fancy, I’ll add a splash of apple cider vinegar for a tangy twist that keeps everyone guessing. For more information, see USDA Food Safety.
Temperature and Safety Mistakes
Checking for doneness is another area where I’ve stumbled. In my early cooking days, I guessed when the chicken was done, which isn’t the smartest move. I learned the hard way that using a meat thermometer is a must. Now, I make sure the internal temperature hits 165°F. Not only does this keep my family safe, but it also ensures perfectly juicy chicken every time.
Creative BBQ Chicken Skillet Recipe Variations
Moving on, I’ve discovered that this bbq chicken skillet recipe becomes a completely new dish with simple swaps and tweaks. Over the years, I’ve experimented with countless variations, and honestly, some of my best discoveries happened by accident when I didn’t have the exact ingredients on hand.
Protein and Vegetable Swaps
Actually, I’ve made this dish with pork chops and turkey thighs when chicken wasn’t available, and both turned out amazing. The cooking times stay roughly the same, which makes substitutions super easy. For vegetables, I love throwing in bell peppers, zucchini, or even sweet potato chunks. My kids actually prefer it when I add corn kernels and diced tomatoes – it becomes this hearty, colorful meal that looks like a fiesta in my cast iron skillet.
International Flavor Profiles
Then there’s the fun part – changing up the flavors entirely. I’ve made Korean-inspired versions using gochujang instead of traditional BBQ sauce, and wow, that was a game-changer. Mexican variations with cumin, chili powder, and lime juice work beautifully too. My neighbor taught me a Mediterranean twist using oregano, lemon, and olives that completely transforms this stovetop bbq chicken into something you’d find at a Greek taverna.
Dietary Adaptations
Plus, I’ve successfully adapted this recipe for various dietary needs. For my gluten-free friends, I use tamari instead of soy sauce and check that my BBQ sauce is certified gluten-free. Keto folks love when I skip potatoes and double up on low-carb vegetables like cauliflower and broccoli.
Storage and Reheating Your One Pan BBQ Chicken
Actually, I’ve learned the hard way that proper cooling makes all the difference for this bbq chicken skillet recipe. First, I let my skillet cool for about fifteen minutes before transferring everything to shallow containers – this prevents that dreaded condensation that makes chicken soggy. Then I store it in my fridge for up to four days, though honestly, it rarely lasts that long in my house. My secret is covering the container tightly with plastic wrap first, then adding the lid for an extra seal.
Freezing for Meal Prep
Next, freezing this cast iron skillet bbq chicken has become my Sunday meal prep lifesaver. I portion individual servings into freezer bags, removing as much air as possible before sealing. The chicken and vegetables freeze beautifully for up to three months, though I’ve noticed the potatoes get slightly softer after thawing. So I sometimes freeze just the chicken and sauce separately, then add fresh vegetables when I’m ready to reheat. My freezer labels always include the date and heating instructions.
Reheating Without Quality Loss
Now, reheating this stovetop bbq chicken properly keeps it from drying out completely. I prefer using my skillet again over medium-low heat, adding a splash of chicken broth to restore moisture. The microwave works too, but I cover it with a damp paper towel and heat in thirty-second intervals. Never rush the reheating process – patience keeps that tender, juicy texture I worked so hard to achieve originally.
Frequently Asked Questions
Find answers to common questions
Final Thoughts
This BBQ Chicken Skillet recipe has become a go-to in my kitchen because it’s so simple yet packed with flavor. I love how it combines tender chicken, smoky barbecue sauce, and fresh veggies into one hearty dish. Plus, it’s ready in under 30 minutes, which makes it perfect for busy weeknights when you’re craving something satisfying but don’t have hours to spend cooking.

What makes this recipe extra special to me is how versatile it is. You can swap out veggies, adjust the spice level, or even throw in some extra toppings like shredded cheese or avocado. It’s a dish that’s hard to mess up and always leaves everyone asking for seconds.
If you’re looking for a quick, delicious meal that feels like comfort food but doesn’t take all night to make, this is it. I’d love for you to give it a try and see how it becomes a favorite in your home too.
Don’t forget to leave a comment and let me know how it turned out for you! What’s your favorite way to customize this skillet dish? I’m always looking for new ideas to mix things up!
Why Trust Me?
I’ve been cooking this recipe for years and have made it dozens of times for family and friends. It’s become one of my go-to dishes, and I’ve refined it through lots of trial and error to get it just right.

BBQ Chicken Skillet
Ingredients
Method
- Season chicken thighs with salt, pepper, smoked paprika, and garlic powder on both sides.
- Heat olive oil in a large cast iron skillet over medium-high heat until shimmering.
- Add seasoned chicken thighs to the hot skillet and cook for 5-6 minutes per side until golden brown.
- Remove chicken from skillet and set aside on a plate, leaving drippings in the pan.
- Add sliced bell peppers and onion to the same skillet and cook for 4-5 minutes until slightly softened.
- Stir brown sugar into the vegetables and cook for 1 minute until fragrant.
- Return chicken to the skillet, nestling it among the vegetables.
- Brush chicken with half the BBQ sauce and cover skillet with a lid.
- Reduce heat to medium-low and simmer for 12-15 minutes until chicken reaches 165°F internal temperature.
- Remove lid, brush with remaining BBQ sauce, and garnish with fresh cilantro before serving.
Notes