6 Easy Steps to Perfect Baked Potatoes with Amazing Crispy Skin
Is there anything more comforting than the smell of a perfect baked potato fresh out of the oven? That crispy, golden skin and fluffy, steaming interior have been my go-to comfort food for as long as I can remember. I’ll never forget the first time I tried making them at home—I was so sure I’d messed them up, but when I pulled them out, they were exactly what I’d been craving. Since then, I’ve perfected my method, and I’m excited to share it with you.
In this article, I’ll walk you through my 6 easy steps to achieve that restaurant-quality baked potato every time. You’ll learn how to choose the right potatoes, prep them for maximum crispiness, and bake them to perfection. Plus, I’ll share my favorite tips for toppings that take them to the next level.
Whether you’re hosting a dinner party or just cooking for yourself, baked potatoes are a versatile and satisfying dish. They’re simple to make, but with a few key tricks, you can turn them into something truly special. Trust me, once you try this method, you’ll never go back to soggy or unevenly cooked potatoes. Let’s get started!
What Makes Perfect Baked Potatoes So Special
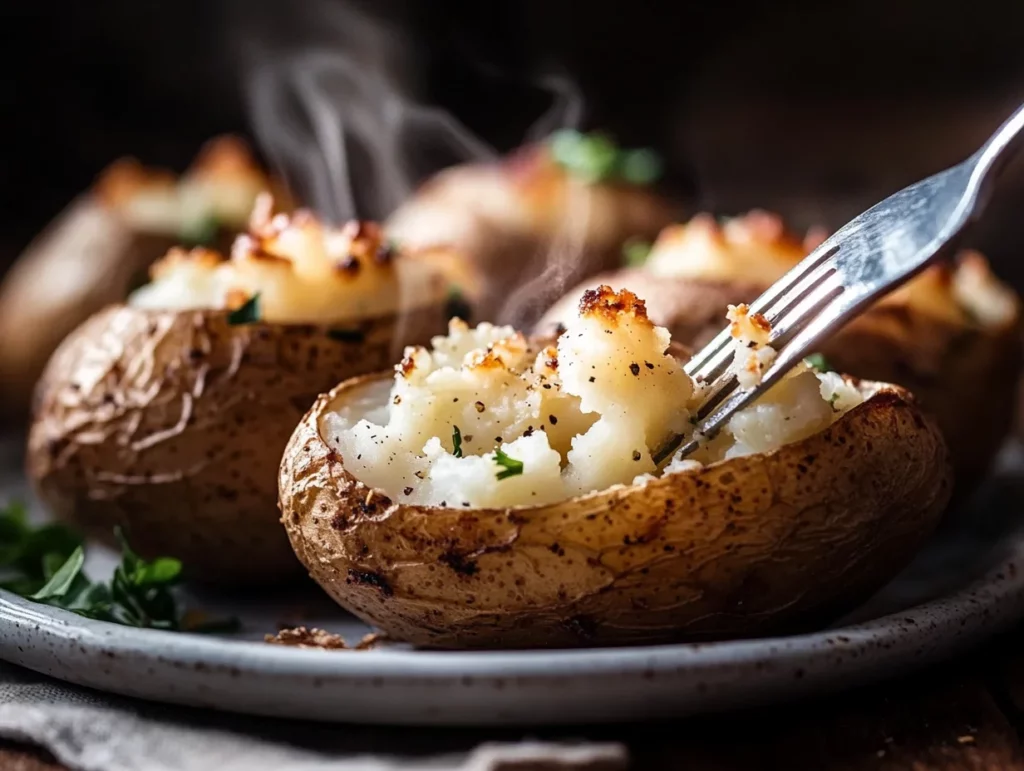
When I think about the perfect baked potato, I’m talking about something that’s almost magical in its simplicity. If you enjoyed this, you might also like Chicken Pot Pie Stuffed Sweet Potatoes. You’ve got that crispy, golden skin that gives way to the fluffiest, most steam-filled interior you can imagine. It’s not just any potato—it’s the kind that makes you close your eyes and savor every single bite.
The Science Behind Perfect Texture
The secret to that amazing texture lies in how steam builds up inside the potato during baking. When you bake at the right temperature, moisture inside turns to steam, creating those light, airy pockets that make each forkful so satisfying. I’ve learned that pricking the skin beforehand prevents bursting while still allowing that perfect steam buildup to happen naturally inside.
Why Russet Potatoes Work Best
Russets are my absolute favorite for this crispy skin baked potato recipe because of their high starch content and thick skin. Their starchy flesh becomes incredibly fluffy when baked, while that thick skin crisps up beautifully in the oven. I’ve tried other varieties, but nothing comes close to the texture you get with a good russet potato.
Common Baked Potato Disappointments
Nothing’s more disappointing than biting into a potato with tough, chewy skin or dense, gummy flesh. These problems usually happen when you skip important prep steps or use the wrong oven temperature. I’ve made these mistakes myself, and now I know exactly how to avoid them every single time.
Why This Baked Potato Method Works Every Time
Now, I’ve been making baked potatoes for years, and I’ve learned that the secret to perfection lies in the details. If you enjoyed this, you might also like Cheesy Ranch Potatoes And Smoked Sausage. My baked potato recipe consistently delivers fluffy insides and crispy skin, and it all comes down to a few key techniques. Let’s break down why this method works so well.
Temperature Science for Perfect Results
When I bake potatoes at 425°F, the high heat works magic. The inside cooks evenly, turning the starch into that fluffy texture we all love. Meanwhile, the exterior gets crispy without drying out. I’ve tried lower temperatures, but they just leave the skin soggy and the interior dense. Trust me, high heat is the way to go for oven baked potatoes that shine.
Why Foil Actually Ruins Baked Potatoes
Years ago, I used to wrap my potatoes in foil, thinking it would help them cook faster. Turns out, foil traps moisture, leaving the skin soft and chewy. Now, I skip the foil entirely. Letting the skin breathe in the oven creates that crispy skin baked potato we all crave. It’s a game-changer for texture and flavor.
The Role of Proper Preparation
Before baking, I always scrub my potatoes clean, prick them with a fork, and rub them with olive oil and salt. The oil helps the skin crisp up, while the salt enhances the flavor. Skipping these steps can lead to disappointing results, like tough skin or bland flavor. Proper prep ensures every bite is perfect.
Essential Ingredients for Perfect Baked Potatoes

Moving on, When it comes to making the perfect baked potatoes, the ingredients are simple but crucial. If you enjoyed this, you might also like Crockpot Bbq Chicken Potatoes. I’ve learned over the years that quality matters, even with something as basic as potatoes. Let me break down what you’ll need to create those fluffy, crispy skin baked potatoes that everyone raves about.
Choosing the Right Potatoes
For me, russet potatoes are the gold standard for baking. Their high starch content gives you that fluffy interior we all love, while their thick skin crisps up beautifully. I always pick potatoes that are similar in size so they cook evenly. Once, I grabbed a mix of small and large ones, and it was a disaster—some were undercooked, others overdone. Lesson learned: uniformity is key for oven baked potatoes.
Salt and Oil Selection Guide
Coarse salt is my secret weapon for seasoning the skin. It adds flavor and helps create that perfect texture. I’ve tried fine salt, but it doesn’t stick as well. For oil, I use high-heat cooking oil like olive or avocado oil. It’s essential for getting that crispy skin baked potato we all crave. One time I skipped the oil, and the skin turned out tough and bland. Never again!
Optional Flavor Enhancers
While potatoes are delicious on their own, I love adding extras for variety. Garlic powder, smoked paprika, or rosemary can take your baked potato recipe to the next level. Sometimes I’ll even sprinkle Parmesan cheese on the skin before baking for an extra savory kick. These little touches make each bite feel special, and they’re totally worth the effort.
Step by Step Perfect Baked Potato Guide

Alright, Getting your baked potato recipe right comes down to following the proper steps. I’ve made countless potatoes over the years, and trust me, these techniques make all the difference between a mediocre spud and potato perfection.
Preparation Steps That Matter
First, I scrub each potato thoroughly under cold running water with a vegetable brush. You’d be surprised how much dirt clings to the skin! Next, I pat them completely dry with paper towels. Then comes the crucial step: piercing the skin 8-10 times with a fork. I learned this lesson the hard way when one exploded in my oven, making a terrible mess. The steam needs somewhere to escape during baking.
Seasoning and Oven Setup
Now I rub each potato with about a teaspoon of high-heat cooking oil, making sure every inch gets covered. Then I roll them in coarse salt, pressing gently so it sticks to the oiled skin. I preheat my oven to 425°F and place the potatoes directly on the middle rack. Actually, I put a baking sheet on the bottom rack to catch any drips—another lesson learned from experience!
Cooking Time and Doneness Tests
For medium potatoes, I bake them for 45-60 minutes. I test doneness by gently squeezing the sides with tongs—they should give slightly when perfectly cooked. The skin should look crispy and feel firm when you tap it with your finger.
Expert Tips for Baked Potato Success
Restaurant Quality Crispy Skin Tricks
Now that we’ve covered that, First, I’ve discovered that salt is your secret weapon for achieving that coveted crispy skin. After oiling my potatoes, I roll them in coarse kosher salt, then place them directly on the oven rack without foil. Actually, many people wrap their potatoes in foil, but that steams the skin instead of crisping it. Also, I brush each potato with a thin layer of olive oil before salting—this creates an incredible golden, crunchy exterior that rivals any steakhouse.
Timing and Temperature Mastery
Next, timing becomes absolutely critical for perfect texture throughout. I always start checking my potatoes at the 45-minute mark, but larger russets often need 60-75 minutes at 425°F. Then I test doneness by inserting a knife into the thickest part—it should slide in effortlessly with no resistance. Plus, I’ve learned that letting them rest for 5 minutes after baking allows the steam to redistribute, creating that perfect fluffy interior you’re craving. For more information, see Steps to Keep Food Safe.
Serving and Presentation Tips
Finally, I immediately cut open my baked potatoes while they’re piping hot to prevent the flesh from becoming gummy. So I slice them lengthwise, then fluff the interior with a fork to create those beautiful, airy peaks. Actually, this technique helps toppings cling better and creates an impressive restaurant-style presentation that’ll make your oven baked potatoes look absolutely professional. For more information, see 7 Health and Nutrition Benefits of Potatoes.
Common Baked Potato Mistakes to Avoid
Now that we’ve covered that, You know how frustrating it is when you pull your baked potatoes out of the oven, and they’re not quite right? I’ve been there, trust me. The skin wasn’t crispy, or the interior was dense. Let’s dive into some common pitfalls. For more information, see Carbohydrates: How carbs fit into a healthy diet.
Temperature and Timing Errors
First off, let’s talk about the temperature. Baking at too low a temperature is a surefire way to ruin your potatoes. I once baked mine at 350°F, and they came out dense and lacking that fluffy center we adore. Sticking to 425°F is essential for a perfectly cooked potato. Timing matters, too—if you rush and take them out too soon, you’ll end up with a hard, undercooked interior. So, always be patient and give them the time they need.
Preparation Mistakes That Ruin Results
Now, onto preparation. One of my early blunders was wrapping the potatoes in foil. I thought it would speed things up, but instead, it made the skin soft and unappetizing. Skipping steps like poking holes or not oiling the skin can also affect the texture. So, I’ve learned to take my time with these crucial prep steps.
Storage and Reheating Problems
Finally, there’s storage. I discovered the hard way that storing baked potatoes in the fridge without proper wrapping leads to dry, unappealing spuds. Reheating can be tricky, too. Microwaving them makes the skin chewy, so I prefer popping them back in the oven at 350°F for about 15 minutes. This method revives the crispy skin and keeps the interior delightfully fluffy.
Baked Potato Variations and Cooking Methods
With that in mind, Over the years, I’ve discovered that there’s more than one way to achieve potato perfection. While my classic oven method remains my go-to, I’ve experimented with faster techniques that still deliver incredible results when you’re short on time.
Air Fryer Baked Potato Method
Actually, my air fryer has become my secret weapon for weeknight dinners. I prep the potatoes exactly the same way—washing, poking, and oiling—then cook them at 400°F for just 35-40 minutes. The circulating air creates an incredibly crispy skin that rivals my oven method. Plus, you’ll save about 20 minutes compared to traditional baking. I flip them halfway through to get even browning on all sides.
Quick Microwave-Oven Combination
When I’m really pressed for time, I use my microwave-oven combo technique. First, I microwave the prepped potatoes for 8-10 minutes to start cooking the interior. Then I transfer them straight to a 425°F oven for 15-20 minutes to crisp up the skin. This method cuts my total cooking time nearly in half while still giving me that perfect contrast between fluffy inside and crispy outside.
Seasoning and Flavor Variations
Now, let’s talk about flavor! I love experimenting with different seasonings beyond basic salt. Sometimes I’ll rub the oiled skin with garlic powder and rosemary, or try smoked paprika for a subtle smoky flavor. My family’s favorite is when I roll them in coarse sea salt mixed with dried herbs before baking.
Frequently Asked Questions
Find answers to common questions
Wrapping Up
I hope you’re as excited as I’m about making these Perfect Baked Potatoes. We’ve covered how a simple combination of fluffy insides and crispy skins can create such a delightful experience. Remember, the magic happens when you give them enough time in the oven and a generous sprinkle of salt. What makes this recipe special to me is how it brings back memories of cozy family dinners where baked potatoes were the star. They’re so versatile and pair well with just about anything you can dream up!
I encourage you to try this recipe and share it with your loved ones. There’s something so rewarding about making a dish that brings smiles to the table. I’d love to hear how your potatoes turn out, so don’t forget to leave a comment with your thoughts or any fun toppings you tried.
So, what’s your favorite way to enjoy a baked potato? Let me know in the comments!
Why Trust Me?
I’ve been cooking this recipe for years and have made it dozens of times for family and friends. It’s become one of my go-to dishes, and I’ve refined it through lots of trial and error to get it just right.

Perfect Baked Potatoes
Ingredients
Method
- Step 1: Preheat your oven to 400°F (200°C).
- Step 2: Wash and scrub the potatoes thoroughly to remove any dirt.
- Step 3: Pat the potatoes dry with a clean towel.
- Step 4: Poke each potato several times with a fork to allow steam to escape.
- Step 5: Rub the potatoes with olive oil, then sprinkle evenly with sea salt, black pepper, garlic powder, onion powder, rosemary, and thyme.
- Step 6: Place the potatoes directly on the oven rack and bake for 60 minutes, until they are tender when pierced with a fork.
- Step 7: Remove the potatoes from the oven, and use a sharp knife to make a slit on the top of each one.
- Step 8: Add a tablespoon of butter to each potato, then fluff the insides with a fork.
- Step 9: Top with sour cream, cheddar cheese, and chives if desired.
- Step 10: Serve immediately and enjoy your perfect baked potatoes!
Notes