Amazing Cinnamon Roll Bliss Bars: 5 Easy Steps!
If you’ve dreamed of transforming classic cinnamon rolls into irresistible, portable treats, Cinnamon Roll Bliss Bars are your answer. These bars capture all the gooey nostalgia and warm spice of everyone’s favorite breakfast pastry—only there’s no rolling dough or setting alarms for yeast to rise. Cinnamon Roll Bliss Bars are about to become your new baking obsession, satisfying cravings and delighting every crowd.
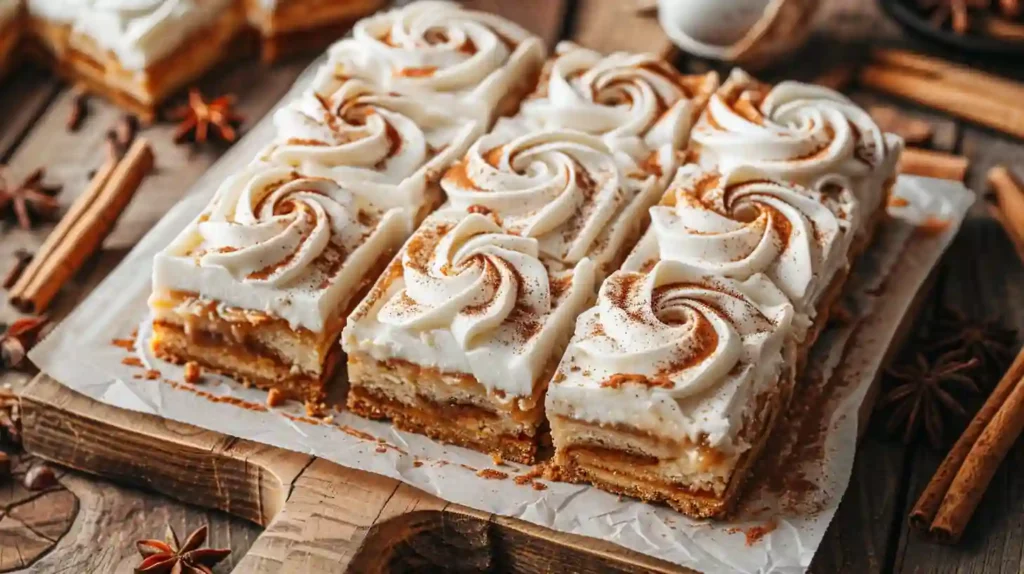
Picture this: a buttery, golden base, ribbons of cinnamon-sugar swirl, and the creamy drizzle of tangy cream cheese glaze—all in one sliceable bar. Cinnamon Roll Bliss Bars deliver that perfect cozy bite whether you’re hosting brunch, fueling a study session, or simply treating yourself because, well, you deserve it!
Ready to discover the magic of Cinnamon Roll Bliss Bars? Settle in with your apron (and maybe your stretchy pants), because these bars are pure comfort baked into every dreamy square.
7 Reasons Cinnamon Roll Bliss Bars Are the Ultimate Dessert Revolution
There’s a reason Cinnamon Roll Bliss Bars have become a dessert sensation in kitchens everywhere, and I’m not just saying that because I baked two batches last week. These bars are the love child of your grandma’s cinnamon rolls and the ease of modern-day snacking. What’s not to love?
First, Cinnamon Roll Bliss Bars skip complicated yeast rising and fussy rolling. Instead, you get all the iconic flavors—cinnamon warmth, brown sugar sweetness, cream cheese tang—packed into bars you can eat on the go.
The crowd-pleasing potential? Off the charts. They’re easy to make ahead, slice, and share, so you’re the hero at every brunch, bake sale, or midnight snack attack. Plus, they store beautifully—if you can resist devouring them all in one go.
Let’s not forget versatility. Feeling fancy? Add toasted pecans. Gluten-free? Swap the flour. You’re the architect of your Cinnamon Roll Bliss Bars destiny. For more on bar cookies and their history, check out the Wikipedia page on bar cookies.
Ingredients
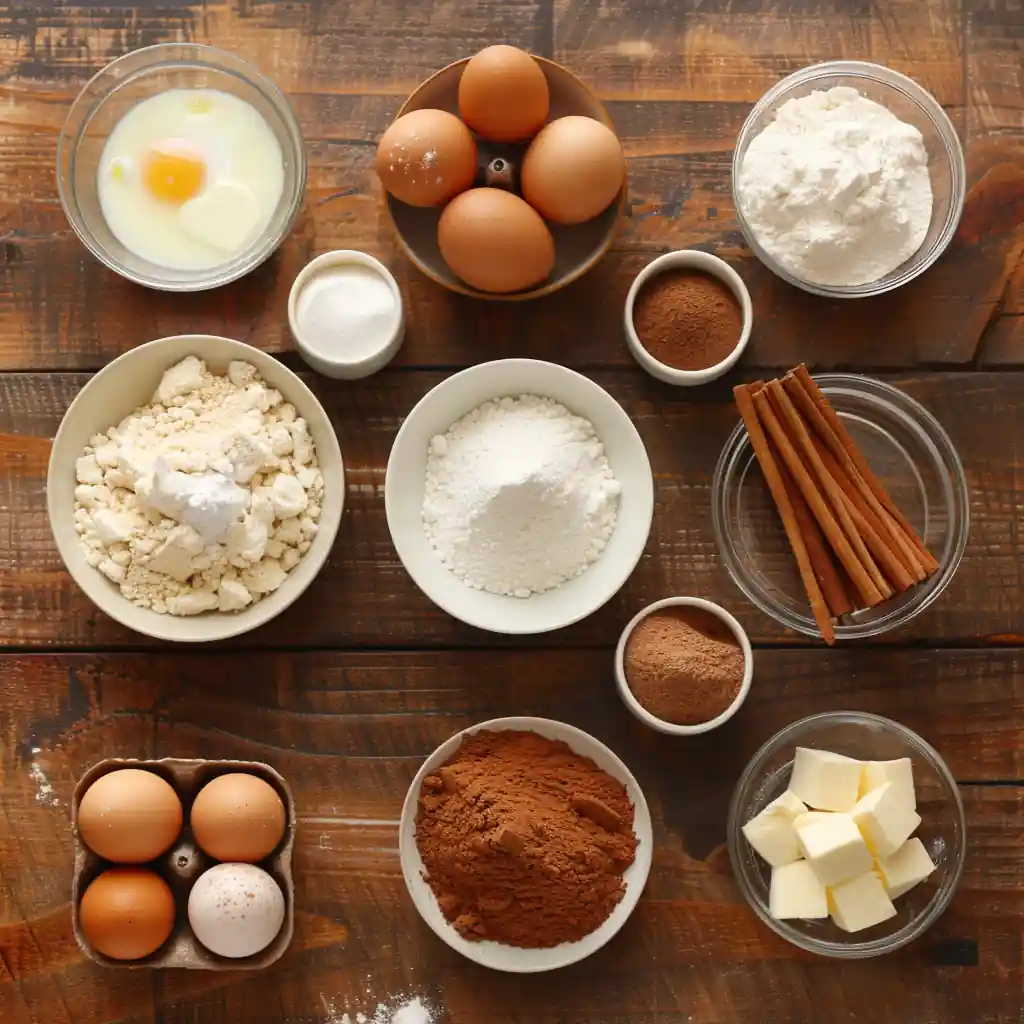
- 1 cup unsalted butter, melted
- 1 1/2 cups packed brown sugar
- 2 large eggs
- 2 tsp vanilla extract
- 2 cups all-purpose flour
- 1 tsp baking powder
- 1/2 tsp salt
- 1 tbsp ground cinnamon
- 1/4 cup granulated sugar (for cinnamon swirl)
- 8 oz cream cheese, softened
- 1/2 cup powdered sugar
- 2 tbsp milk (or heavy cream)
- 1/2 tsp vanilla extract (for glaze)
Instructions
- Preheat your oven to 350°F (175°C). Line a 9×13-inch baking pan with parchment paper, leaving an overhang for easy lifting later. Trust me—future you will thank you.
- In a large bowl, combine melted butter and brown sugar. Whisk until smooth and caramel-hued.
- Beat in eggs and vanilla extract until well blended.
- In another bowl, whisk together flour, baking powder, and salt. Gently fold the dry mixture into the wet ingredients. Don’t overmix—just until there are no streaks of flour.
- Spread half of the batter evenly into your prepared pan. It’ll be thick, but a spatula (or your clean fingers) works wonders.
- Mix ground cinnamon and granulated sugar in a small bowl. Sprinkle evenly over the batter layer for that classic cinnamon roll swirl.
- Dollop the remaining batter over the cinnamon layer, smoothing as best you can. Use a knife or skewer to gently swirl the layers together in a marbled effect.
- Bake for 25–30 minutes, or until a toothpick in the center comes out clean. The top should be golden and your kitchen will smell, frankly, amazing.
- Let the bars cool completely in the pan. This is the hardest part. Cue self-control.
- For the glaze: Beat softened cream cheese, powdered sugar, milk, and vanilla extract until smooth. Drizzle or slather (I’m not judging) over the cooled Cinnamon Roll Bliss Bars.
Pro Tips for Success
- Measure flour correctly: Spoon into the cup and level off — too much flour can make bars dense.
- Cool completely before frosting: Warm bars will melt your icing.
- Add extra cinnamon: Sprinkle cinnamon sugar on top before baking for a little crunch.
- Use room temperature cream cheese: It blends smoothly with butter for silky icing.
- Double the batch: These freeze beautifully for future treats.
- Drizzle instead of spreading: For lighter sweetness, drizzle icing instead of fully covering.
Serving Suggestions
These Cinnamon Roll Bliss Bars are as versatile as they are delicious. Serve them:
- Warm with a drizzle of icing for a gooey cinnamon roll vibe.
- Cooled with a hot cup of coffee or tea.
- Cut into small squares for party dessert trays.
- With a scoop of vanilla ice cream for an indulgent dessert plate.
How to Store and Reheat for Maximum Freshness
Keep Cinnamon Roll Bliss Bars moist and chewy by storing them in an airtight container at room temperature for up to 3 days. If you need them to last longer (honestly, good luck), pop them in the fridge for up to a week.
For that “just baked” magic, warm a piece in the microwave for 10-15 seconds. The glaze melts, the cinnamon aroma wafts, and—boom—you’re back in bliss-bar heaven.
Pro tip: Freeze individual bars tightly wrapped for up to 2 months. Thaw at room temp or zap for 20 seconds to enjoy instant comfort, anytime.
5 Game-Changing Benefits of Cinnamon Roll Bliss Bars You Need to Know
- No-Fuss Baking: Cinnamon Roll Bliss Bars spare you the drama of kneading, proofing, and waiting. Just mix, swirl, bake, and boom—bliss!
- Dessert for Any Occasion: Bring them to brunches, potlucks, or keep them for solo snacking. These bars impress both crowds and picky eaters.
- Portable & Sliceable: Bars are easy to transport, stack, and share. No sticky unrolling like classic cinnamon rolls. TBH, they travel better than I do.
- Customizable Flavors: From chocolate chips to nuts, you’re one step away from your signature Cinnamon Roll Bliss Bars twist.
- Kid-Approved Comfort: The sweet aroma and creamy glaze make kids and adults happy. It’s a family favorite that won’t last long on the plate.
Common Mistakes to Avoid with Cinnamon Roll Bliss Bars
- Overmixing the batter can make your bars tough—not tender. Stir just enough to combine.
- Skipping the swirl is like skipping the best part of a cinnamon roll—don’t do it!
- Overbaking dries them out. Check at 25 minutes; remember, ovens are as moody as cats.
- Pouring glaze on warm bars causes runny puddles. Wait until they’re fully cool for best results.
- Storing uncovered leads to stale, sad bars. Keep them airtight for max bliss.
Alternatives and Variations for Every Preference
Want to personalize your Cinnamon Roll Bliss Bars? Switch the all-purpose flour for a gluten-free blend to make them celiac-friendly. Swap out the cream cheese glaze for maple or vanilla icing, or add mini chocolate chips for a fun twist.
Prefer less sugar? Reduce the brown sugar by 1/4 cup and bump up the cinnamon—spice lovers rejoice! Feeling fancy? Toss in toasted pecans or walnuts for crunch and extra flavor depth. The options are endless, so play with your favorite add-ins.
Nutrition Facts (Per Bar)
- Calories: 260
- Protein: 3g
- Carbohydrates: 35g
- Fat: 12g
- Fiber: 1g
- Sodium: 170mg
These bars are sweet and buttery but surprisingly light — one square goes a long way. Perfect for a small treat that feels bakery-special.
Frequently Asked Questions
Find answers to common questions
Wrapping Up: Why Cinnamon Roll Bliss Bars Deserve a Spot in Your Recipe Lineup
Cinnamon Roll Bliss Bars are the answer when you crave the comfort of cinnamon rolls, minus the marathon baking session. Simple to make, easy to share, and guaranteed to bring smiles, Cinnamon Roll Bliss Bars are the dessert bars you never knew you needed. For more ideas, check out our guide on Sausage Egg Breakfast Rolls.
Ready to create a batch of your own Cinnamon Roll Bliss Bars? Grab your mixing bowl and try out this modern classic. For more inspiration on all things baking, explore this collection of expert baking recipes.
If you enjoyed this recipe, share it or pin it for later.
Follow us on Pinterest for more yummy sweets and fun baking recipes:
Amazing Cinnamon Roll Bliss Bars: 5 Easy Steps!
Cinnamon Roll Bliss Bars capture all the gooey nostalgia of cinnamon rolls—warm spice, buttery crust, and a tangy cream‑cheese glaze—but in easy, portable bars with no yeast required.
- Prep Time: 10 minutes
- Cook Time: 30 minutes
- Total Time: 40 minutes (including cooling & glazing)
- Yield: 16 bars
- Category: Dessert
- Method: Baking
- Cuisine: American
- Diet: Vegetarian
Ingredients
1 cup unsalted butter, melted
1 ½ cups packed brown sugar
2 large eggs
2 tsp vanilla extract
2 cups all‑purpose flour
1 tsp baking powder
½ tsp salt
1 tbsp ground cinnamon
¼ cup granulated sugar (for cinnamon swirl)
8 oz cream cheese, softened
½ cup powdered sugar
2 tbsp milk (or heavy cream)
½ tsp vanilla extract (for glaze)
Instructions
1. Preheat oven to 350°F (175°C). Line a 9×13‑inch baking pan with parchment, leaving an overhang.
2. In a large bowl, whisk melted butter and brown sugar until smooth.
3. Beat in eggs and vanilla extract.
4. In another bowl, whisk together flour, baking powder and salt; fold into wet mixture just until combined.
5. Spread half the batter into the prepared pan.
6. In a small bowl, mix granulated sugar and ground cinnamon; sprinkle over the batter layer.
7. Dollop the remaining batter on top and use a knife or skewer to swirl layers gently.
8. Bake for 25‑30 minutes, until a toothpick comes out clean.
9. Let bars cool completely in the pan.
10. For the glaze: Beat cream cheese, powdered sugar, milk, and vanilla extract until smooth. Drizzle or spread over cooled bars. Slice and serve.
Notes
Store bars in an airtight container at room temperature up to 3 days, or refrigerate up to a week. They freeze well—wrap individual bars tightly and freeze up to 2 months. Thaw or microwave briefly before serving.