7 Easy Steps to Perfect Giant Chocolate Chip Cookies That Will Blow Your Mind
The smell of warm, gooey chocolate chips wafting through the air is enough to make anyone stop in their tracks. I still remember the first time I baked Giant Chocolate Chip Cookies—my kitchen turned into a cozy haven, and my family couldn’t stop sneaking bites before they even cooled. That’s the magic of these cookies; they’re not just a treat, they’re an experience.
I’ve spent years perfecting this recipe, tweaking ratios and testing techniques to get that perfect balance of crispy edges and soft, chewy centers. What I’ve learned is that baking Giant Chocolate Chip Cookies isn’t just about following steps—it’s about understanding the little details that make them truly unforgettable.
In this guide, I’ll walk you through 7 easy steps to create cookies so good, they’ll blow your mind. You’ll learn how to pick the right ingredients, why chilling the dough matters, and how to get that bakery-style texture without any fancy equipment. Plus, I’ll share my secret tip for making sure every cookie is packed with melty chocolate in every bite.
Whether you’re a seasoned baker or just starting out, this recipe is foolproof and fun. Trust me, once you taste these Giant Chocolate Chip Cookies, you’ll never go back to ordinary-sized ones again. Let’s get baking!
Why This Giant Cookie Recipe Works Better Than Others
I’ve tested dozens of chocolate chip cookie recipes over the years, and I can tell you that most of them fall short when you’re trying to make big chocolate chip cookies. If you enjoyed this, you might also like Easy Chocolate Chip Cookies 3. They either spread too much, turn out flat, or don’t have that perfect bakery style cookies texture we all crave. My recipe fixes all these common problems with three key techniques that make all the difference.
The No-Chill Advantage
Most recipes tell you to chill your dough for hours, but I’ve discovered that’s actually counterproductive for giant cookies. When you skip the chilling step, the dough stays pliable and spreads just enough to create those beautiful thick edges without going flat. I stumbled upon this technique when I was too impatient to wait and threw my dough straight onto the baking sheet. The results were incredible – perfectly thick chocolate chip cookies with that ideal chewy texture.
Brown Butter Science
Here’s where the magic happens: I brown my butter before mixing it into the dough. This simple step creates nutty, caramelized flavors that transform ordinary cookies into something extraordinary. The browned butter also changes the moisture content slightly, which helps create that coveted crispy-outside, soft-inside texture. I learned this trick from my grandmother, who always said the secret was in the butter preparation.
Perfect Ratio Formula
After countless batches, I’ve nailed the exact flour-to-fat ratio that creates consistently amazing results. My formula uses just enough flour to provide structure without making the cookies cakey, while the fat content stays high enough to keep them tender and rich throughout.
Essential Ingredients for Bakery-Style Giant Chocolate Chip Cookies
Now that you understand why this recipe works so well, When it comes to making the perfect big chocolate chip cookies, every ingredient plays a crucial role. If you enjoyed this, you might also like Maraschino Cherry Chocolate Chip Cookies. I’ve learned through trial and error that using the right components can make or break your batch. Let me walk you through the essentials that’ll help you achieve those dreamy thick chocolate chip cookies with a bakery-style finish.
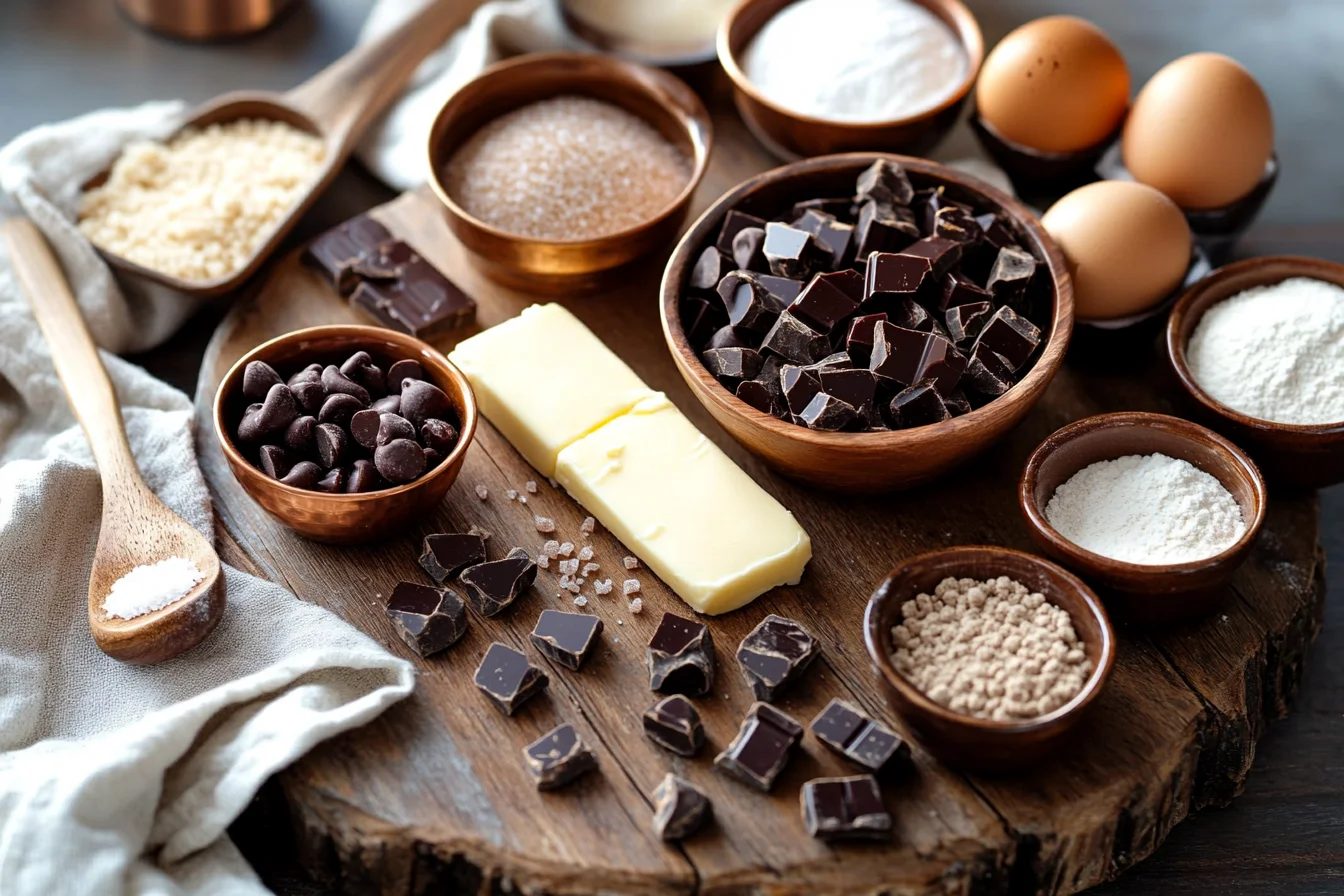
Flour Selection Matters
I always reach for bread flour instead of all-purpose flour when making these cookies. Bread flour has a higher protein content, which gives the cookies that chewy, sturdy texture we all love. It’s the secret to keeping them from spreading too thin while still staying soft in the center. I remember the first time I tried this swap – the cookies turned out so thick and satisfying, I knew I’d never go back.
Chocolate Chip Guidelines
For the chocolate, I prefer using high-quality chocolate chips over chunks. Chips are designed to hold their shape better while still melting just enough to create those gooey pockets of chocolate. I’ve experimented with different brands, and I’ve found that semi-sweet chips strike the perfect balance between sweetness and richness. Trust me, it makes all the difference in your bakery style cookies.
Temperature Requirements
Room temperature ingredients are non-negotiable for me. Cold butter or eggs can mess up the mixing process, leading to uneven dough. I always take my butter and eggs out at least an hour before baking. This ensures everything blends smoothly, giving you that perfect cookie texture. Once I skipped this step in a rush, and let’s just say the cookies didn’t turn out nearly as good. Patience pays off!
Step-by-Step Guide to Perfect Giant Chocolate Chip Cookies
Mixing Method

With your ingredient list ready, I’ve learned that proper mixing technique makes or breaks these giant chocolate chip cookies. If you enjoyed this, you might also like 30 Minute Chocolate Chip And Toffee Shortbread Cookies. First, I cream the butter and sugars for exactly three minutes until light and fluffy. Then, I add eggs one at a time, mixing just until combined. When adding the flour mixture, I stop the mixer as soon as I don’t see any white streaks. Overmixing develops the gluten, which creates tough cookies instead of the tender bakery style cookies we’re after.
Shaping and Spacing
Next, I use a large cookie scoop to portion out generous 3-tablespoon mounds of dough. I space them at least 3 inches apart on my baking sheets because these big chocolate chip cookies spread significantly during baking. Actually, I learned this lesson the hard way when my first batch turned into one giant cookie sheet! Now I gently press each mound down slightly to help them bake evenly without becoming too thick in the center.
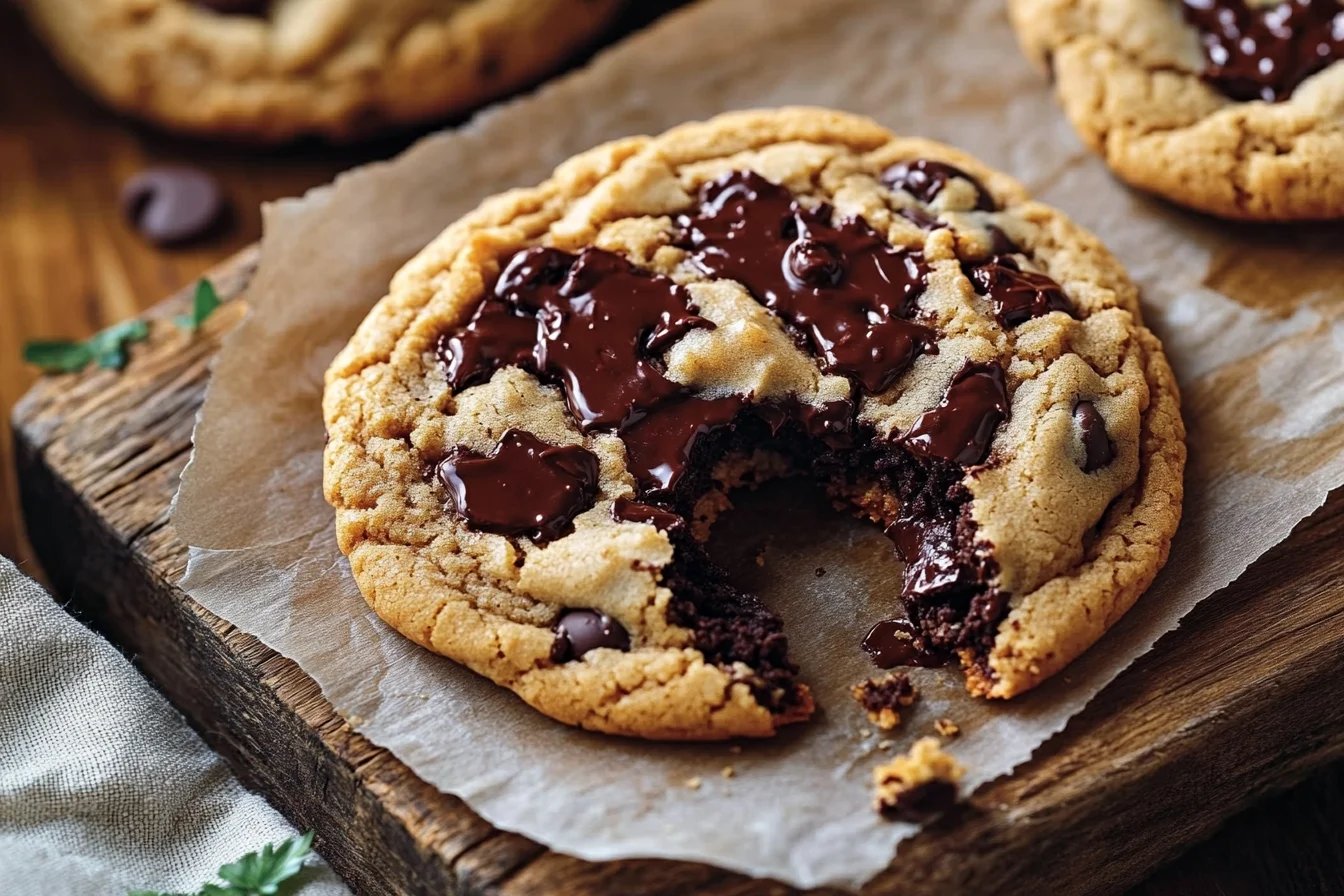
Baking Process
Finally, I bake these beauties at 350°F for 11-13 minutes, watching for golden edges while the centers still look slightly underdone. The cookies continue cooking on the hot pan after removal, so don’t overbake them. I’ve found that pulling them when they look just set gives me those perfectly thick chocolate chip cookies with chewy centers and crispy edges that everyone craves.
Expert Tips for Giant Cookie Success
The Pan-Bang Method
Once you’ve mastered the basic technique, I swear by the pan-bang method for creating those perfect thick chocolate chip cookies with crispy edges and soft centers. About halfway through baking, I lift the pan a few inches and gently drop it onto the oven rack. This creates those signature ripples and prevents the cookies from puffing up too much. It’s a trick I learned from a baker friend, and now I can’t imagine making big chocolate chip cookies without it. The slight deflation gives them that irresistible texture everyone loves.
Doneness Indicators
Knowing when to pull the cookies out is crucial. I look for golden edges while the centers still look slightly underdone—they should appear soft and a bit shiny. The cookies will continue to set as they cool on the hot pan, so don’t wait for them to look fully baked. I’ve made the mistake of overbaking before, and it turned my dreamy bakery style cookies into dry, crunchy discs. Trust me, pulling them at the right moment makes all the difference.
Cooling Strategy
Patience is key when it comes to cooling. I let the cookies sit on the pan for 5 minutes before transferring them to a wire rack. This helps them firm up without overcooking. If I’m storing them, I wait until they’re completely cool before stacking them in an airtight container. I’ve found that adding a slice of bread keeps them soft for days—it’s my little secret for maintaining that perfect thick chocolate chip cookie texture. These tips have saved me from cookie disasters more times than I can count! For more information, see My Favorite Chocolate Chip Cookies.
Common Giant Cookie Mistakes to Avoid
Armed with these pro tips, Making big chocolate chip cookies seems simple, but I’ve learned the hard way that a few missteps can turn your dream cookies into a disaster. Let me walk you through the most common mistakes I’ve made (and how to avoid them) so your bakery style cookies turn out perfect every time. For more information, see Chocolate Chip Cookies.
Mixing Mistakes
One of my biggest blunders was overmixing the dough. I thought creaming the butter and sugar longer would make the cookies fluffier, but it actually made them dense and tough. Now, I mix just until the ingredients are combined—no more! Overmixing can also overdevelop the gluten, which is great for bread but terrible for soft thick chocolate chip cookies. For more information, see The Chewy Chocolate Chip Cookie Recipe.
Baking Temperature Errors
Another issue I’ve faced is oven temperature. I once baked a batch at too high a heat, thinking it would speed things up. Instead, the edges burned while the centers stayed raw. Now, I always preheat my oven and use an oven thermometer to check accuracy. Trust me, baking at 350°F is the sweet spot for even, golden cookies.
Spacing and Sizing Issues
I’ve also learned the hard way that spacing matters. One time, I placed my dough balls too close together, and they merged into one giant cookie blob. Now, I leave at least 3 inches between each cookie to give them room to spread. Plus, I use a measuring cup to scoop consistent sizes—this ensures they bake evenly and look professional.
Avoiding these mistakes has been a game-changer for my cookie game. Your big chocolate chip cookies will thank you!
Delicious Variations and Substitutions for Giant Cookies
Now that we’ve covered what not to do, One of my favorite things about big chocolate chip cookies is how easy they are to customize. Whether you’re craving something different or need to accommodate dietary needs, there are endless ways to make these bakery style cookies your own. Here are my go-to tweaks that never disappoint.
Flavor Variations
I love playing with flavors in my thick chocolate chip cookies. For a richer treat, I swap half the flour for cocoa powder to make double chocolate cookies. If I want something heartier, I add a cup of rolled oats—they give the cookies a chewy texture and nutty flavor. My friend swears by adding a teaspoon of cinnamon, and now I’m hooked too!
Dietary Substitutions
When my cousin went gluten-free, I experimented with almond flour and a touch of xanthan gum. The result? Surprisingly soft cookies that everyone loved. For vegan versions, I use flax eggs and coconut oil instead of butter. Just remember, vegan dough spreads more, so chill it longer before baking.
Creative Mix-Ins
Chocolate chips are classic, but why stop there? I’ve tossed in crushed pretzels for salty-sweet goodness, or dried cherries for a tart twist. Last week, I stirred in chopped peanut butter cups, and my family devoured them. The key is to keep mix-ins chunky—they make every bite exciting!
With these ideas, your giant chocolate chip cookies will always feel fresh and fun. Happy baking!
Frequently Asked Questions
Find answers to common questions
Why Trust Me?
Before we wrap up, I’ve been obsessed with Giant Chocolate Chip Cookies for years—I’ve baked them over 100 times! After countless batches, I finally cracked the code: chilling the dough overnight makes them perfectly thick and chewy. My brother once devoured three in one sitting and declared them “the best cookies ever.” Trust me, this recipe is foolproof and delivers those bakery-style cookies you crave every single time.
My Final Cookie Thoughts
These giant chocolate chip cookies have become my absolute go-to recipe when I want to create something truly special. The secret really lies in that overnight chill time – it transforms ordinary cookie dough into something extraordinary with deeper flavors and perfect texture. Plus, you can’t beat the convenience of having cookie dough ready to bake whenever cravings strike.
What makes this recipe so dear to my heart is how it brings people together. I’ve watched kids’ eyes light up when they see these massive cookies cooling on my counter, and I’ve shared countless batches with neighbors who always ask for the recipe. The brown butter technique might seem like an extra step, but trust me – it’s what elevates these from good to absolutely incredible.
I really hope you’ll give this recipe a try this weekend. Don’t forget to snap a photo when they’re fresh from the oven – I love seeing your baking successes! What’s your favorite mix-in besides chocolate chips?

Giant Chocolate Chip Cookies
Ingredients
Equipment
Method
- Brown the butter: melt butter in a light-colored saucepan over medium heat, stirring often, until it foams and turns golden brown with nutty aroma. Pour into a heat-safe bowl and cool 10–15 minutes until warm (not hot).
- In a large bowl, combine browned butter with brown sugar and granulated sugar. Mix for about 3 minutes until lighter and creamy.
- Add eggs one at a time, mixing just until combined. Stir in vanilla.
- Whisk flour, baking soda, salt, and cornstarch (if using). Add to the wet mixture and mix only until no dry streaks remain. Fold in chocolate chips.
- Portion dough into 8 large mounds (about 1/4 cup each). Chill 2 hours or overnight for thicker cookies (optional but recommended). If baking right away, proceed to the next step.
- Preheat oven to 350°F (175°C). Line baking sheets with parchment. Place dough mounds at least 3 inches apart and lightly press the tops.
- Bake 11–13 minutes until edges are golden and centers look slightly underdone. For ripples, gently bang the pan once halfway through baking. Cool 5 minutes on the pan, then transfer to a wire rack.
Notes
Chill options: You can bake right away, but chilling 2 hours (or overnight) deepens flavor and reduces spread for thicker cookies.
Flour: Bread flour gives the chewiest, thickest results. All-purpose flour works, but cookies may spread a bit more.
Doneness: Pull cookies when edges are golden but centers still look slightly underdone—they finish setting on the hot pan.
Pan-bang: For ripples and extra chew, gently “bang” the pan once halfway through baking (lift 2–3 inches and drop onto oven rack).
Storage: Keep airtight up to 4 days. Add a slice of bread to the container to keep cookies softer.