6 Tips for the Best Strawberry Scones Ever
Can you smell that buttery, fruity aroma wafting from your kitchen right now? Strawberry scones should fill your home with that irresistible scent of fresh berries and golden pastry that makes everyone come running to the kitchen.
I’ll never forget the first time I made these beauties for my sister’s bridal shower. Actually, I was terrified they’d turn out dense and heavy like hockey pucks, but instead, they emerged from the oven perfectly flaky and tender. The sweet strawberries had created little pockets of jammy goodness throughout each scone, and honestly, they disappeared faster than I could count them. My aunt even asked for the recipe before she’d finished her first bite!
Now, I’ve spent years perfecting my technique, and I’m excited to share my top six secrets with you today. You’ll learn exactly how to keep your butter cold for maximum flakiness, why you shouldn’t overwork the dough, and my trick for getting those gorgeous, towering scones every single time. Plus, I’ll show you how to fold in fresh strawberries without turning your dough into a mushy mess.
These aren’t just any ordinary scones – they’re the kind that’ll make your neighbors suddenly become your best friends. So grab your apron and let’s create some magic together. Trust me, once you master these tips, you’ll be the scone queen of your neighborhood!
What Makes Strawberry Scones Special
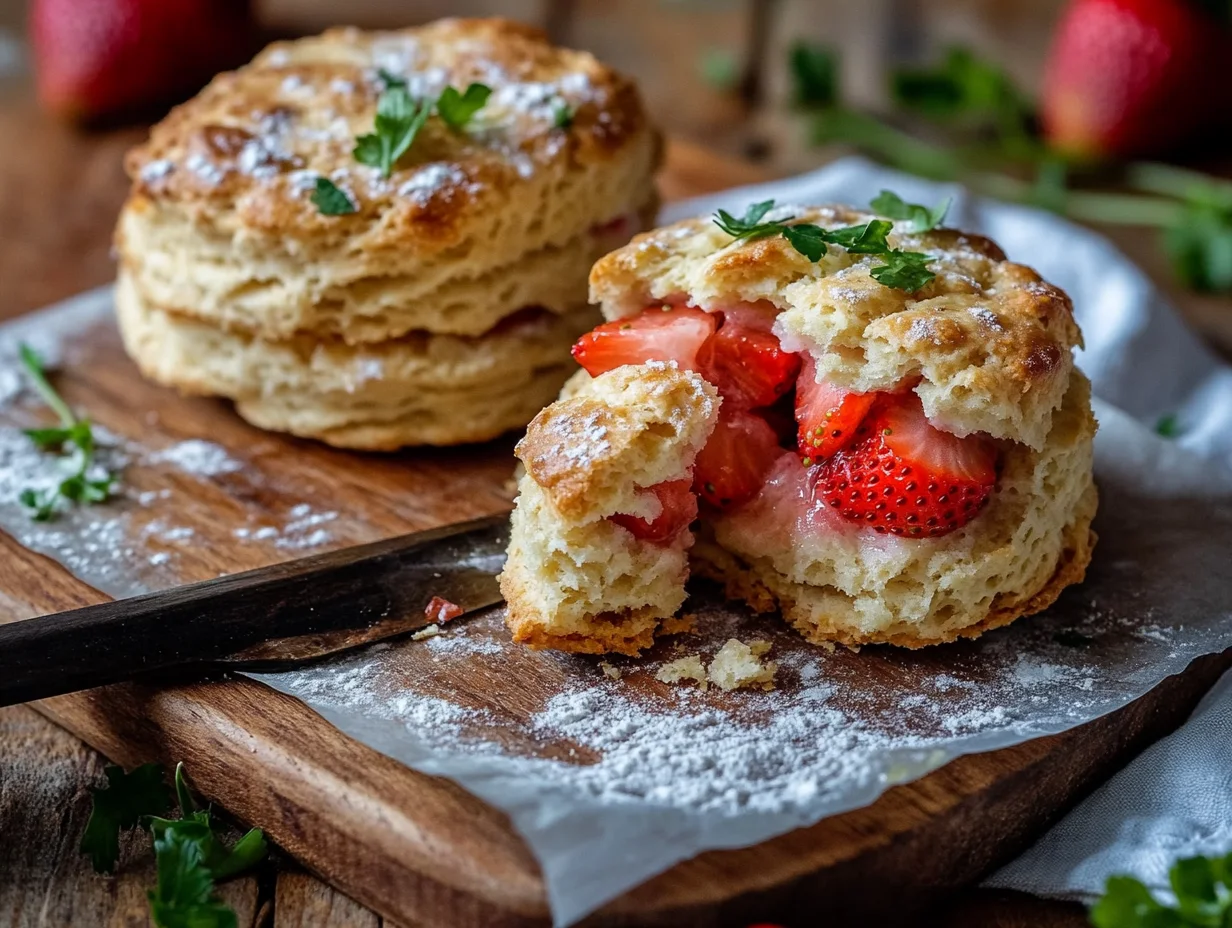
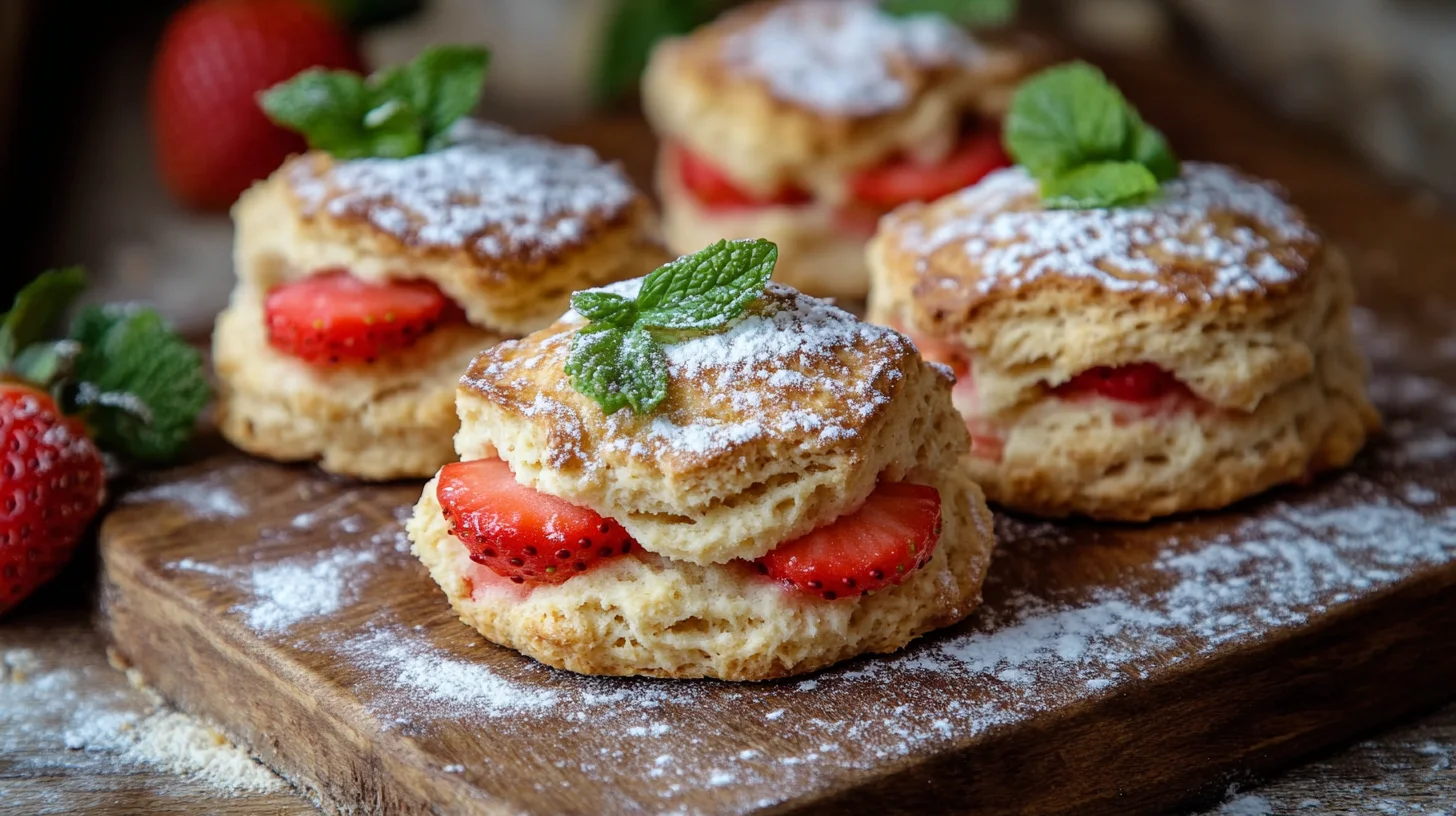
There’s something magical about biting into a warm strawberry scone—the way the buttery layers crumble just enough to reveal juicy, jammy pockets of fruit. If you enjoyed this, you might also like Deep Fried Strawberry Cheescake. I’ll never forget the first time I made them for a lazy Sunday brunch. My friends thought I’d bought them from some fancy bakery, but nope—just my humble kitchen and a handful of fresh strawberries. What sets these scones apart is their perfect balance of tender crumb and bright, fruity flavor. Unlike blueberry or plain scones, strawberries add a natural sweetness that caramelizes slightly as they bake, creating little bursts of summer in every bite.
Flavor Profile
The flavor profile of strawberry scones is like a cozy hug with a playful twist. The buttery, slightly tangy dough (especially if you use buttermilk) complements the strawberries’ natural sweetness, while a hint of vanilla or lemon zest can add depth. I love how versatile they are—sometimes I’ll toss in white chocolate chips or a drizzle of glaze for extra decadence. The key is using ripe strawberries; their juices seep into the dough as they bake, creating those irresistible jammy streaks. And if you’re out of heavy cream? No problem. My strawberry scones without heavy cream recipe uses Greek yogurt, and they’re just as tender.
Versatility & Homemade Charm
What I adore most about strawberry scones is how forgiving they are. You can tweak the recipe to match your mood—add almonds for crunch, swap in coconut milk for a dairy-free version, or even freeze them for later. Homemade scones have this rustic charm that store-bought ones just can’t replicate. Plus, there’s nothing like the smell of warm strawberries and butter wafting through your kitchen. My strawberry scones with buttermilk have become a family favorite because they’re not too sweet, making them perfect for breakfast or afternoon tea. Once you try them fresh from the oven, you’ll understand why they’re so special.
Why Strawberry Scones Are a Must-Try
With that in mind, Actually, I can’t think of a better way to start your morning than with warm strawberry scones straight from the oven. If you enjoyed this, you might also like Homemade Strawberry Pound Cake Recipe. These little beauties are surprisingly easy to make, requiring just basic pantry staples like flour, butter, and sugar. What makes them special is how the fresh strawberries burst during baking, creating these gorgeous pink streaks throughout the tender crumb. I’ve been making them for years, and they never fail to impress guests at brunch or when I need a quick afternoon pick-me-up.
The best part? You don’t need fancy equipment or complicated techniques. My strawberry scones recipe comes together in about 20 minutes, and most of that time is hands-off baking. Plus, you can customize them But you like—add lemon zest for brightness, toss in some white chocolate chips, or even make them dairy-free using coconut oil instead of butter.
Versatility in Serving
Now, here’s where strawberry scones really shine—they work for literally any occasion. I serve them warm for breakfast with a pat of butter and honey, but they’re equally perfect for afternoon tea with clotted cream and jam. My kids love them packed in their lunch boxes, while my husband grabs them for his morning commute with coffee.
You can dress them up or down depending on your mood. Sometimes I’ll drizzle them with a simple vanilla glaze for special occasions, other times I keep them plain and rustic. They’re also fantastic split and toasted the next day, almost like an English muffin but infinitely more delicious.
Essential Ingredients for Strawberry Scones
Next up, Creating perfect strawberry scones starts with gathering the right ingredients, and honestly, you probably have most of them sitting in your pantry right now. If you enjoyed this, you might also like Strawberry Oatmeal Bars. I always keep my basic scone ingredients stocked because there’s nothing worse than craving fresh scones and realizing you’re missing something essential. The beauty of this strawberry scones recipe lies in its simplicity—just flour, sugar, baking powder, cold butter, and your choice of liquid dairy.
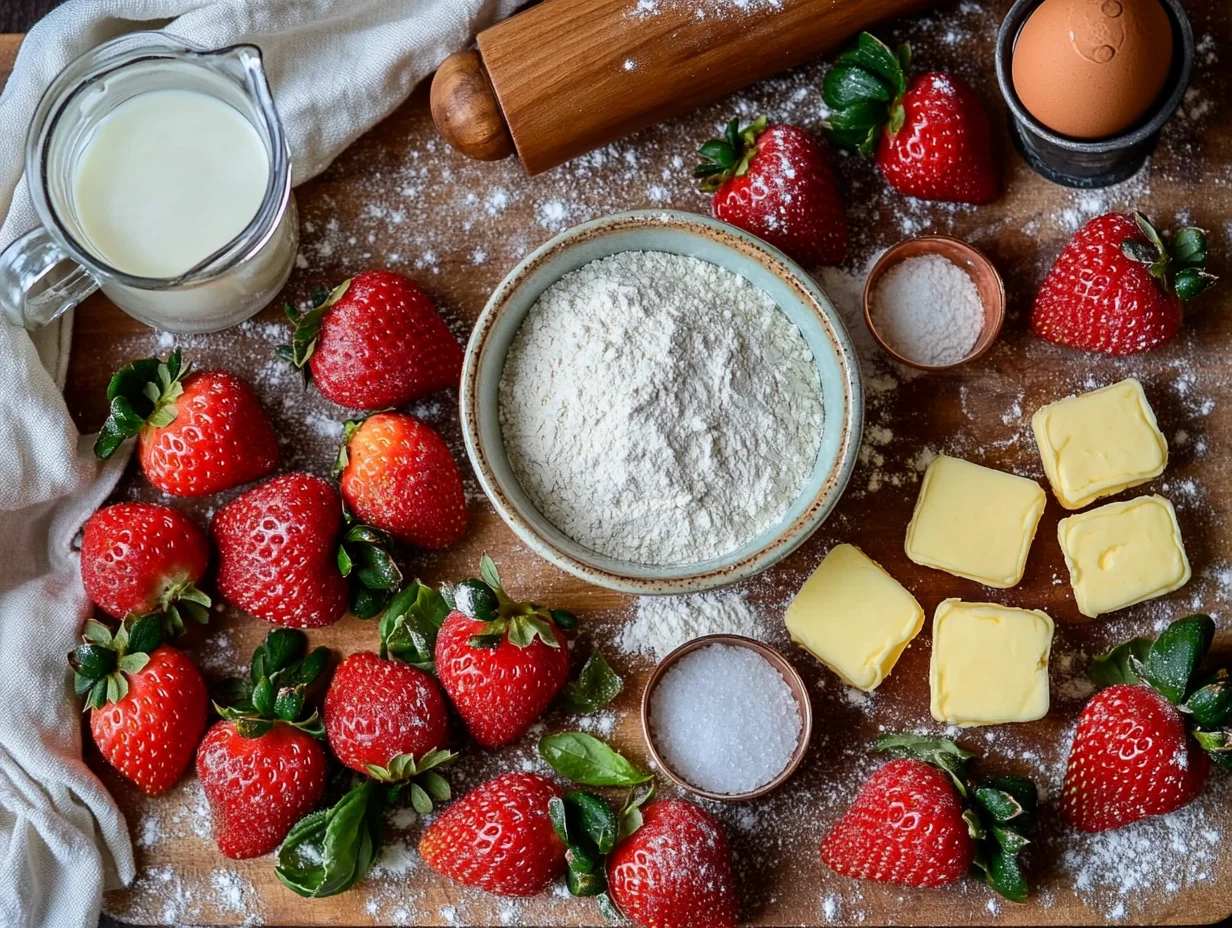
For the dry ingredients, I use all-purpose flour as my base, though you can substitute up to half with whole wheat flour if you’re feeling adventurous. The sugar adds sweetness while helping create that golden-brown exterior we all love. Fresh baking powder is absolutely crucial here—I learned this lesson the hard way when my scones came out flat and dense because my baking powder was expired.
Choosing the Right Strawberries
Now, let’s talk about the star ingredient—those gorgeous strawberries that make these scones absolutely irresistible. I’ve experimented with both fresh and frozen strawberries countless times, and both work beautifully in different ways. Fresh strawberries give you those lovely juice pockets that burst in your mouth, while frozen ones hold their shape better during mixing and baking.
When I’m using fresh strawberries, I always choose berries that are ripe but still firm—mushy strawberries will turn your dough into a soggy mess. I hull them and cut them into small chunks, about the size of my thumbnail. Actually, I’ve found that slightly underripe strawberries work even better because they won’t break down as much during the mixing process, giving you distinct strawberry pieces in every bite.
Step-by-Step Guide to Making Strawberry Scones
Mixing and Shaping
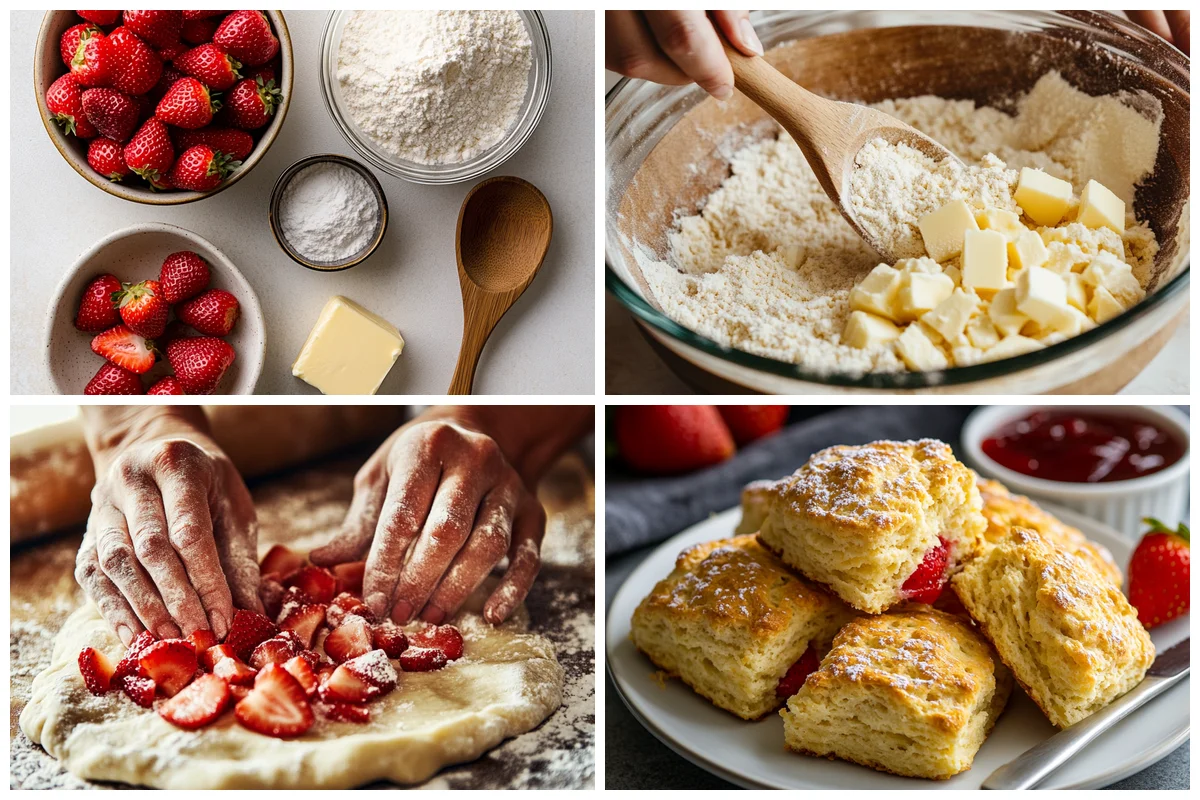
Now, When it comes to mixing and shaping the dough for strawberry scones, having everything prepped makes the process smoother. First, I gather all my ingredients and equipment. I make sure my baking powder is fresh because, as I mentioned before, expired baking powder can lead to disappointing results. I like to use a large mixing bowl and a pastry cutter, which makes combining the dry ingredients with the butter a breeze. After adding the buttermilk, the dough will start to come together, but you don’t want to overwork it. Overmixing could make the scones tough, and nobody wants that.
Once the dough is mixed, I gently fold in those delicious strawberry chunks, trying not to crush them. Then, I turn the dough out onto a floured surface and pat it into a circle, about an inch thick. I use a sharp knife to cut it into eight wedges. At this point, I can already imagine how lovely these scones will smell as they bake. After placing them on a baking sheet, I make sure they have enough space to expand. Baking them until they’re golden brown takes about 20 minutes, and letting them cool slightly ensures they’re just right for enjoying.
Choosing the Right Strawberries
Now, let’s talk about the star ingredient—those gorgeous strawberries that make these scones absolutely irresistible. I’ve experimented with both fresh and frozen strawberries countless times, and both work beautifully in different ways. Fresh strawberries give you those lovely juice pockets that burst in your mouth, while frozen ones hold their shape better during mixing and baking.
When I’m using fresh strawberries, I always choose berries that are ripe but still firm—mushy strawberries will turn your dough into a soggy mess. I hull them and cut them into small chunks, about the size of my thumbnail. Actually, I’ve found that slightly underripe strawberries work even better because they won’t break down as much during the mixing process, giving you distinct strawberry pieces in every bite.
Expert Tips for Perfect Strawberry Scones
Temperature and Timing
So, Temperature control is absolutely crucial when I’m making strawberry scones, and I’ve learned this lesson through many batches that didn’t turn out quite right. First, I always keep my butter ice-cold and cut it into small cubes before adding it to the flour mixture. Cold butter creates those flaky layers we all love in a perfect scone. Next, I chill my buttermilk for at least thirty minutes before using it, which helps maintain that cold temperature throughout the mixing process. For more information, see Whole Grains: Hearty Options for a Healthy Diet.
Actually, I’ve discovered that my oven runs about fifteen degrees hot, so I always bake my strawberry scones at 375°F instead of the standard 400°F. This prevents the outsides from browning too quickly while the centers remain undercooked. Plus, I rotate the baking sheet halfway through the twenty-minute baking time to ensure even golden browning. Now, here’s something I wish I’d known earlier—letting the shaped scones rest in the refrigerator for fifteen minutes before baking helps them hold their shape better and creates an even more tender crumb. For more information, see Strawberries 101: Nutrition Facts and Health Benefits.
Enhancing Flavor Combinations
My strawberry scones recipe has evolved over the years, and I’ve found several flavor additions that complement the berries beautifully without overwhelming their natural sweetness. So often, I’ll add a teaspoon of vanilla extract to my buttermilk mixture, which creates a lovely background note that makes the strawberries pop even more. Then, I sometimes fold in the zest of half a lemon, which brightens the entire flavor profile and adds a subtle citrus note. For more information, see FDA Food Safety.
Actually, I’ve experimented with adding a tablespoon of poppy seeds or a quarter cup of chopped toasted almonds to create different texture variations. These strawberry scones without heavy cream still maintain their tender crumb while offering exciting new flavor dimensions that my family absolutely adores.
Common Mistakes to Avoid
Avoiding Overmixing
Moving on, The biggest mistake I made when I first started making strawberry scones was treating the dough like bread dough. Actually, I used to knead and work that poor dough until it became tough and chewy instead of tender and flaky. Now I know that overmixing is the enemy of perfect scones, and I handle my dough with the gentleness it deserves.
When I’m combining my wet and dry ingredients, I use a fork to bring everything together just until the mixture looks shaggy and holds together when pressed. Then I turn it onto my floured counter and gently pat it into shape with my hands rather than rolling it aggressively. This strawberry scones recipe works best when you can still see little streaks of flour in the dough—that’s your signal to stop mixing. Plus, I’ve learned that those visible butter pieces create the flaky layers we all love, so I don’t work them in completely. The key is remembering that scone dough should look rough and rustic, not smooth and uniform like cake batter.
Using Warm Ingredients
Another mistake I see people make constantly is using ingredients straight from room temperature or worse, warm from the microwave. Actually, I learned this lesson the hard way when my strawberry scones with buttermilk spread flat instead of rising tall and proud. Cold butter is absolutely essential because it creates steam pockets as it melts during baking, which gives you those beautiful flaky layers.
Now I always keep my buttermilk in the refrigerator until the very moment I need it, and I make sure my butter is cold enough that it breaks into distinct pieces when I cut it into the flour. Sometimes I’ll even pop my mixing bowl in the freezer for five minutes before starting. This strawberry scones without heavy cream technique has saved me countless times from flat, dense results that nobody wants to eat.
Variations and Substitutions
Now that we’ve covered that, When it comes to making strawberry scones, there’s lots of room to get creative with flavors and ingredients. I’ve found that experimenting with different fruits and flavors can lead to delightful surprises. For instance, swapping strawberries for blueberries or raspberries can give your scones a whole new vibe. The tartness of raspberries pairs well with a bit of lemon zest, adding a refreshing twist to the classic strawberry scones recipe. If you’re feeling adventurous, you can even mix in some chopped peaches or apricots for a summery touch. You can also try adding a splash of vanilla or almond extract to the dough for an extra layer of flavor that complements the fruit beautifully.
Now, if you’re like me and sometimes run out of buttermilk, don’t worry—there are easy substitutions. I often use a mixture of milk and lemon juice as a stand-in for buttermilk, and it works like a charm. For those who prefer strawberry scones without heavy cream, you can substitute with full-fat yogurt or sour cream to maintain that rich texture.
I remember one time I used coconut milk when I was out of both cream and yogurt, and it added a subtle tropical flair that my family loved. Adding nuts or spices can also take your scones to the next level. A handful of chopped almonds or walnuts adds a lovely crunch, while a pinch of cinnamon or nutmeg can warm up the flavors, especially during the cooler months.
Frequently Asked Questions
Find answers to common questions
Final Thoughts
As we wrap up our delightful journey into the world of strawberry scones, I hope you’re as excited as I’m to make these at home. We’ve walked through how using fresh, juicy strawberries adds a burst of flavor that store-bought versions just can’t match. Plus, we discovered that the secret to achieving that perfect, flaky texture is all in how you handle the dough—gentle hands make a world of difference!
This recipe holds a special spot in my heart because it reminds me of baking with my grandma on lazy Sunday afternoons. Those moments filled our kitchen with laughter and the sweet aroma of strawberries and freshly baked scones.
I encourage you to try these scones yourself and share the experience with someone you love. Leave a comment below to let me know how they turned out. Did you add your own twist? What’s your favorite berry to bake with? I can’t wait to hear your stories!
Why Trust Me?
I’ve been cooking this recipe for years and have made it dozens of times for family and friends. It’s become one of my go-to dishes, and I’ve refined it through lots of trial and error to get it just right.
Strawberry Scones
Ingredients
Method
- Step 1: Preheat oven to 425°F and line a baking sheet with parchment paper.
- Step 2: In a large bowl, whisk together flour, granulated sugar, baking powder, and salt.
- Step 3: Cut cold butter into small cubes and work into flour mixture using pastry cutter or fingers until mixture resembles coarse crumbs with some pea-sized butter pieces.
- Step 4: Gently fold diced strawberries into the flour mixture, being careful not to crush them.
- Step 5: In a separate bowl, whisk together heavy cream, egg, and vanilla extract until well combined.
- Step 6: Pour wet ingredients into dry ingredients and gently mix with a fork until dough just comes together – don’t overmix.
- Step 7: Turn dough onto floured surface and gently pat into 8-inch circle about 3/4 inch thick, then cut into 8 wedges.
- Step 8: Place scones on prepared baking sheet, brush tops with cream, sprinkle with coarse sugar, and bake for 16-18 minutes until golden brown.
- Step 9: Cool on baking sheet for 5 minutes before transferring to wire rack to cool completely.
Notes